Post-back Pixels
Set up post-back pixels to track conversions and send transaction data to advertising platforms like Facebook, Google, and other networks for accurate attribution and optimization.
What are Postback Pixels?
Unlike Connections which process events every 5 minutes and require configuration in the Connections area, Postback Pixels fire in real-time directly from your campaigns and offers without requiring a formal connection setup, perfect for instant affiliate tracking, analytics, and conversion notifications.
Postback pixels are a powerful feature that automatically notifies your external systems (like CRMs, analytics tools, or affiliate networks) when important events happen in your business. Think of them as instant messengers that send information to your other business tools whenever a customer makes a purchase, cancels a subscription, or completes other important actions.
Where Can You Configure Postback Pixels?
VRIO provides multiple locations where you can configure postback pixels, each serving different purposes and triggering at different points in your customer journey:
1. Campaign Level Postbacks
Location: Campaign configuration (campaign_pixel_block)
Triggers: When a successful order is processed for any offer in the campaign
Use Case: General conversion tracking for all orders within a campaign
2. Campaign Tracking Pixels (Conditional Postbacks)
Location: Campaign tracking pixel configuration
Triggers: When a successful order is processed AND matches specific tracking variables
Use Case: Conditional postbacks based on traffic source, affiliate partner, or other tracking criteria
Override Capability: Can completely override campaign-level postback settings
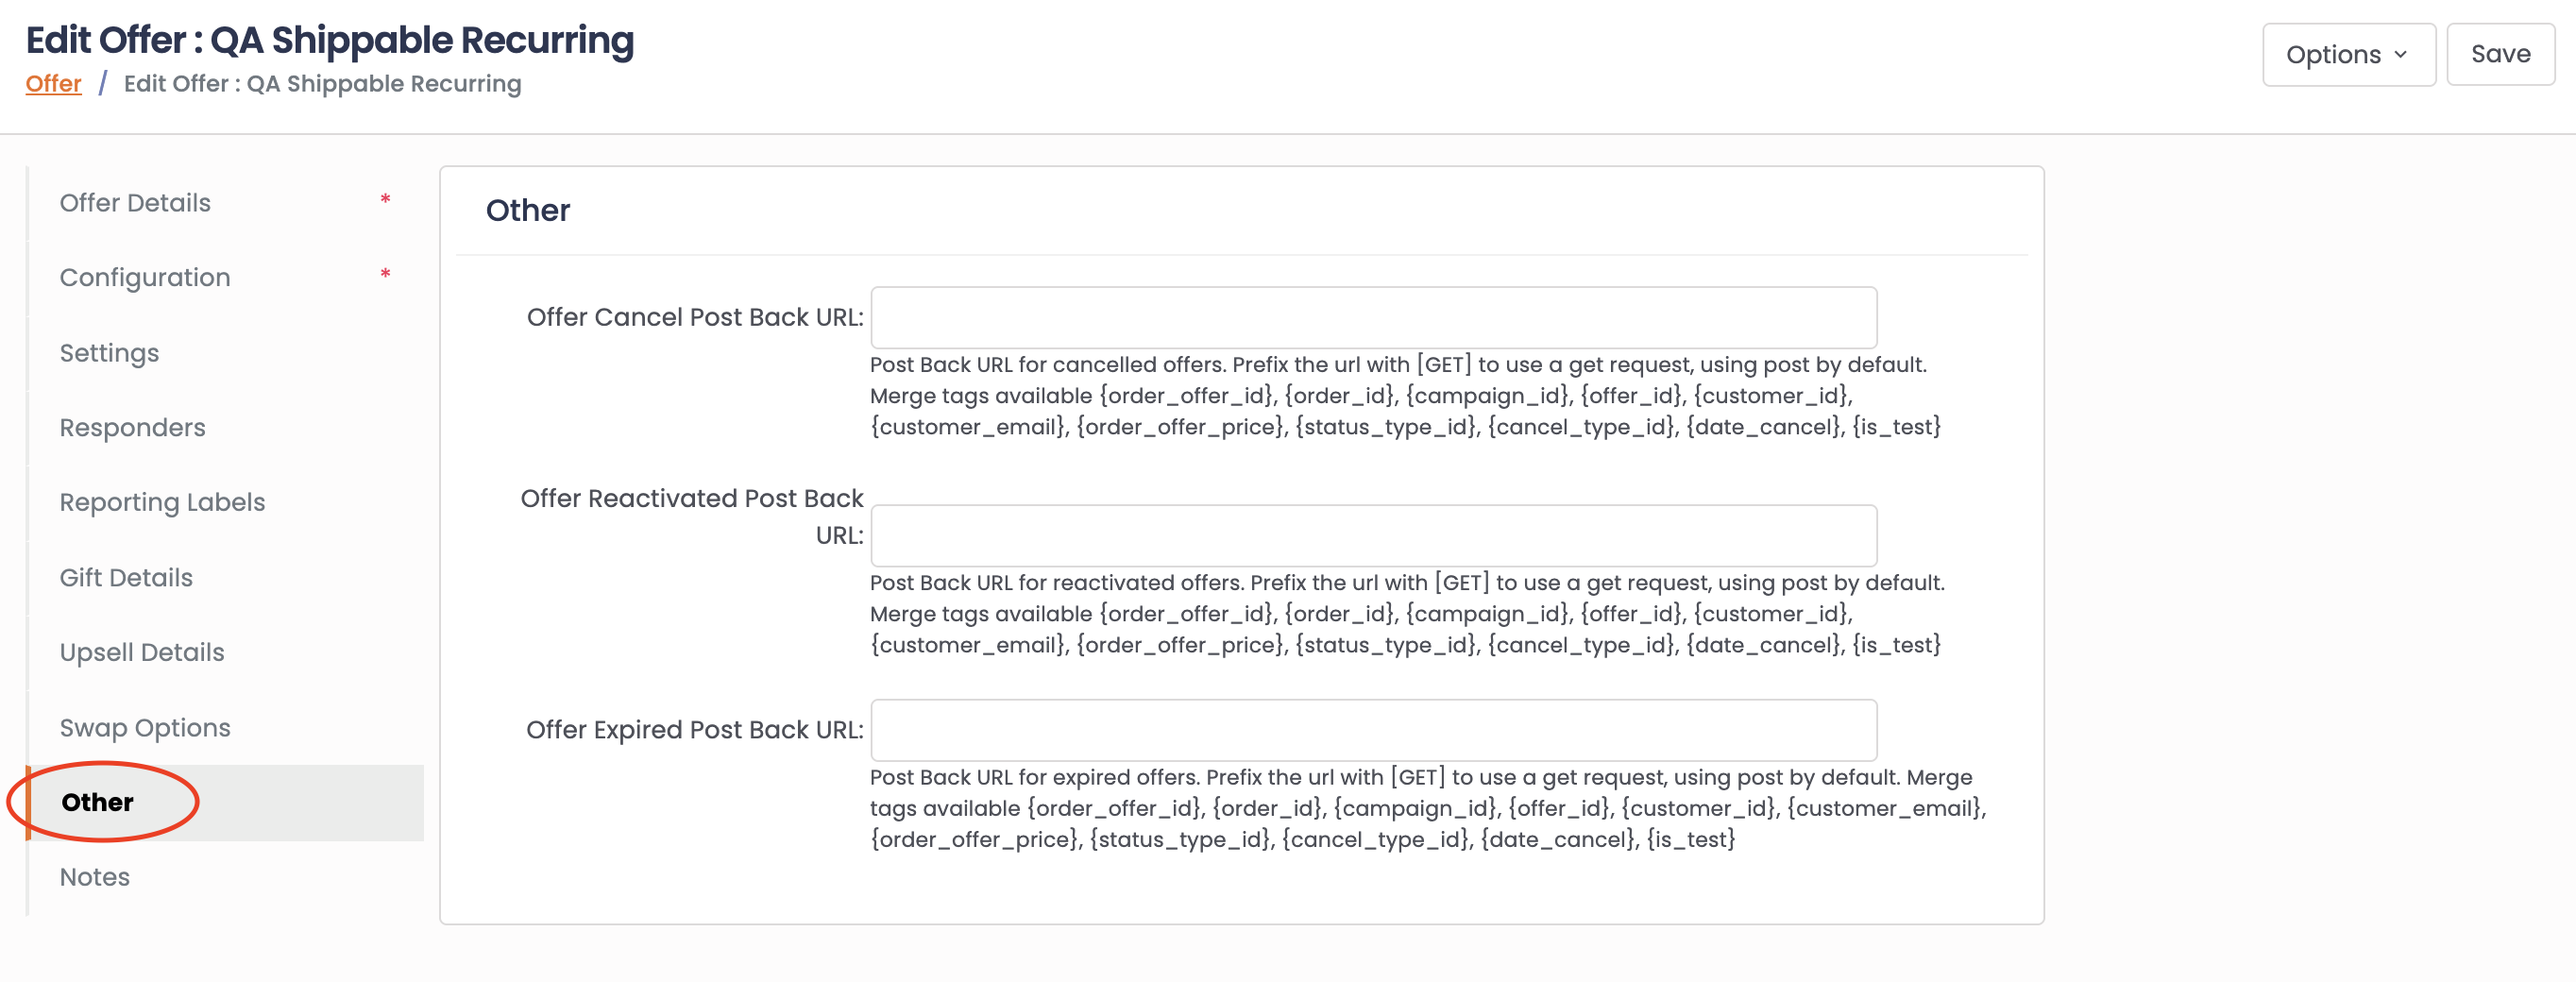
3. Offer Level Postbacks
Location: Offer configuration
Triggers: When specific subscription/offer events occur
Types Available:
- Cancellation:
offer_cancel_postback_url- Fires when subscription is cancelled - Reactivation:
offer_reactivate_postback_url- Fires when cancelled subscription is reactivated - Expiration:
offer_expire_postback_url- Fires when subscription expires naturally
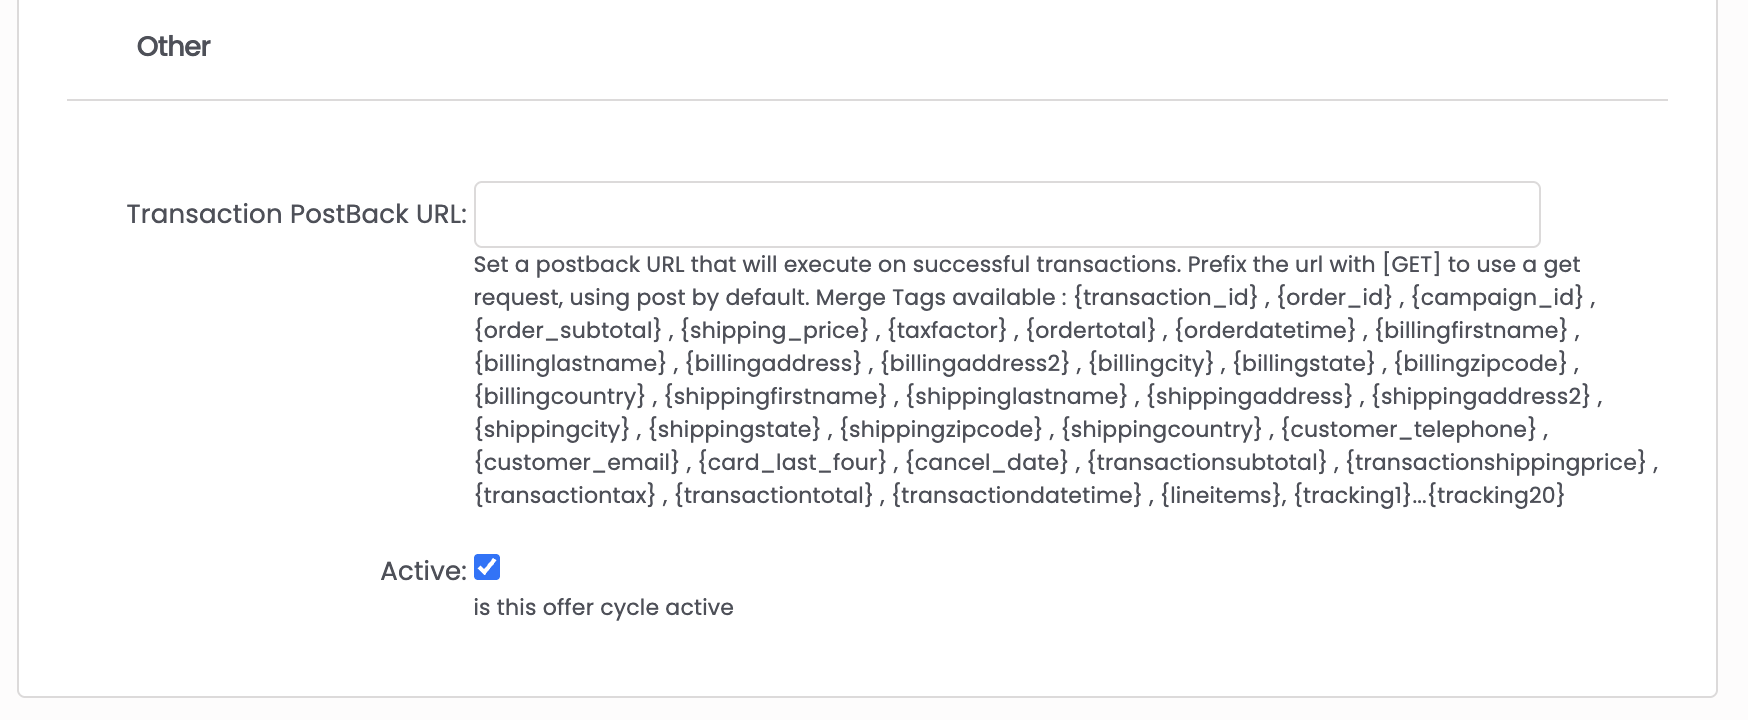
4. Transaction Level Postbacks
Location: Offer cycle configuration (transaction_postback_url)
Triggers: When a successful transaction is processed for that specific offer cycle
Use Case: Detailed transaction-level tracking with comprehensive data variables
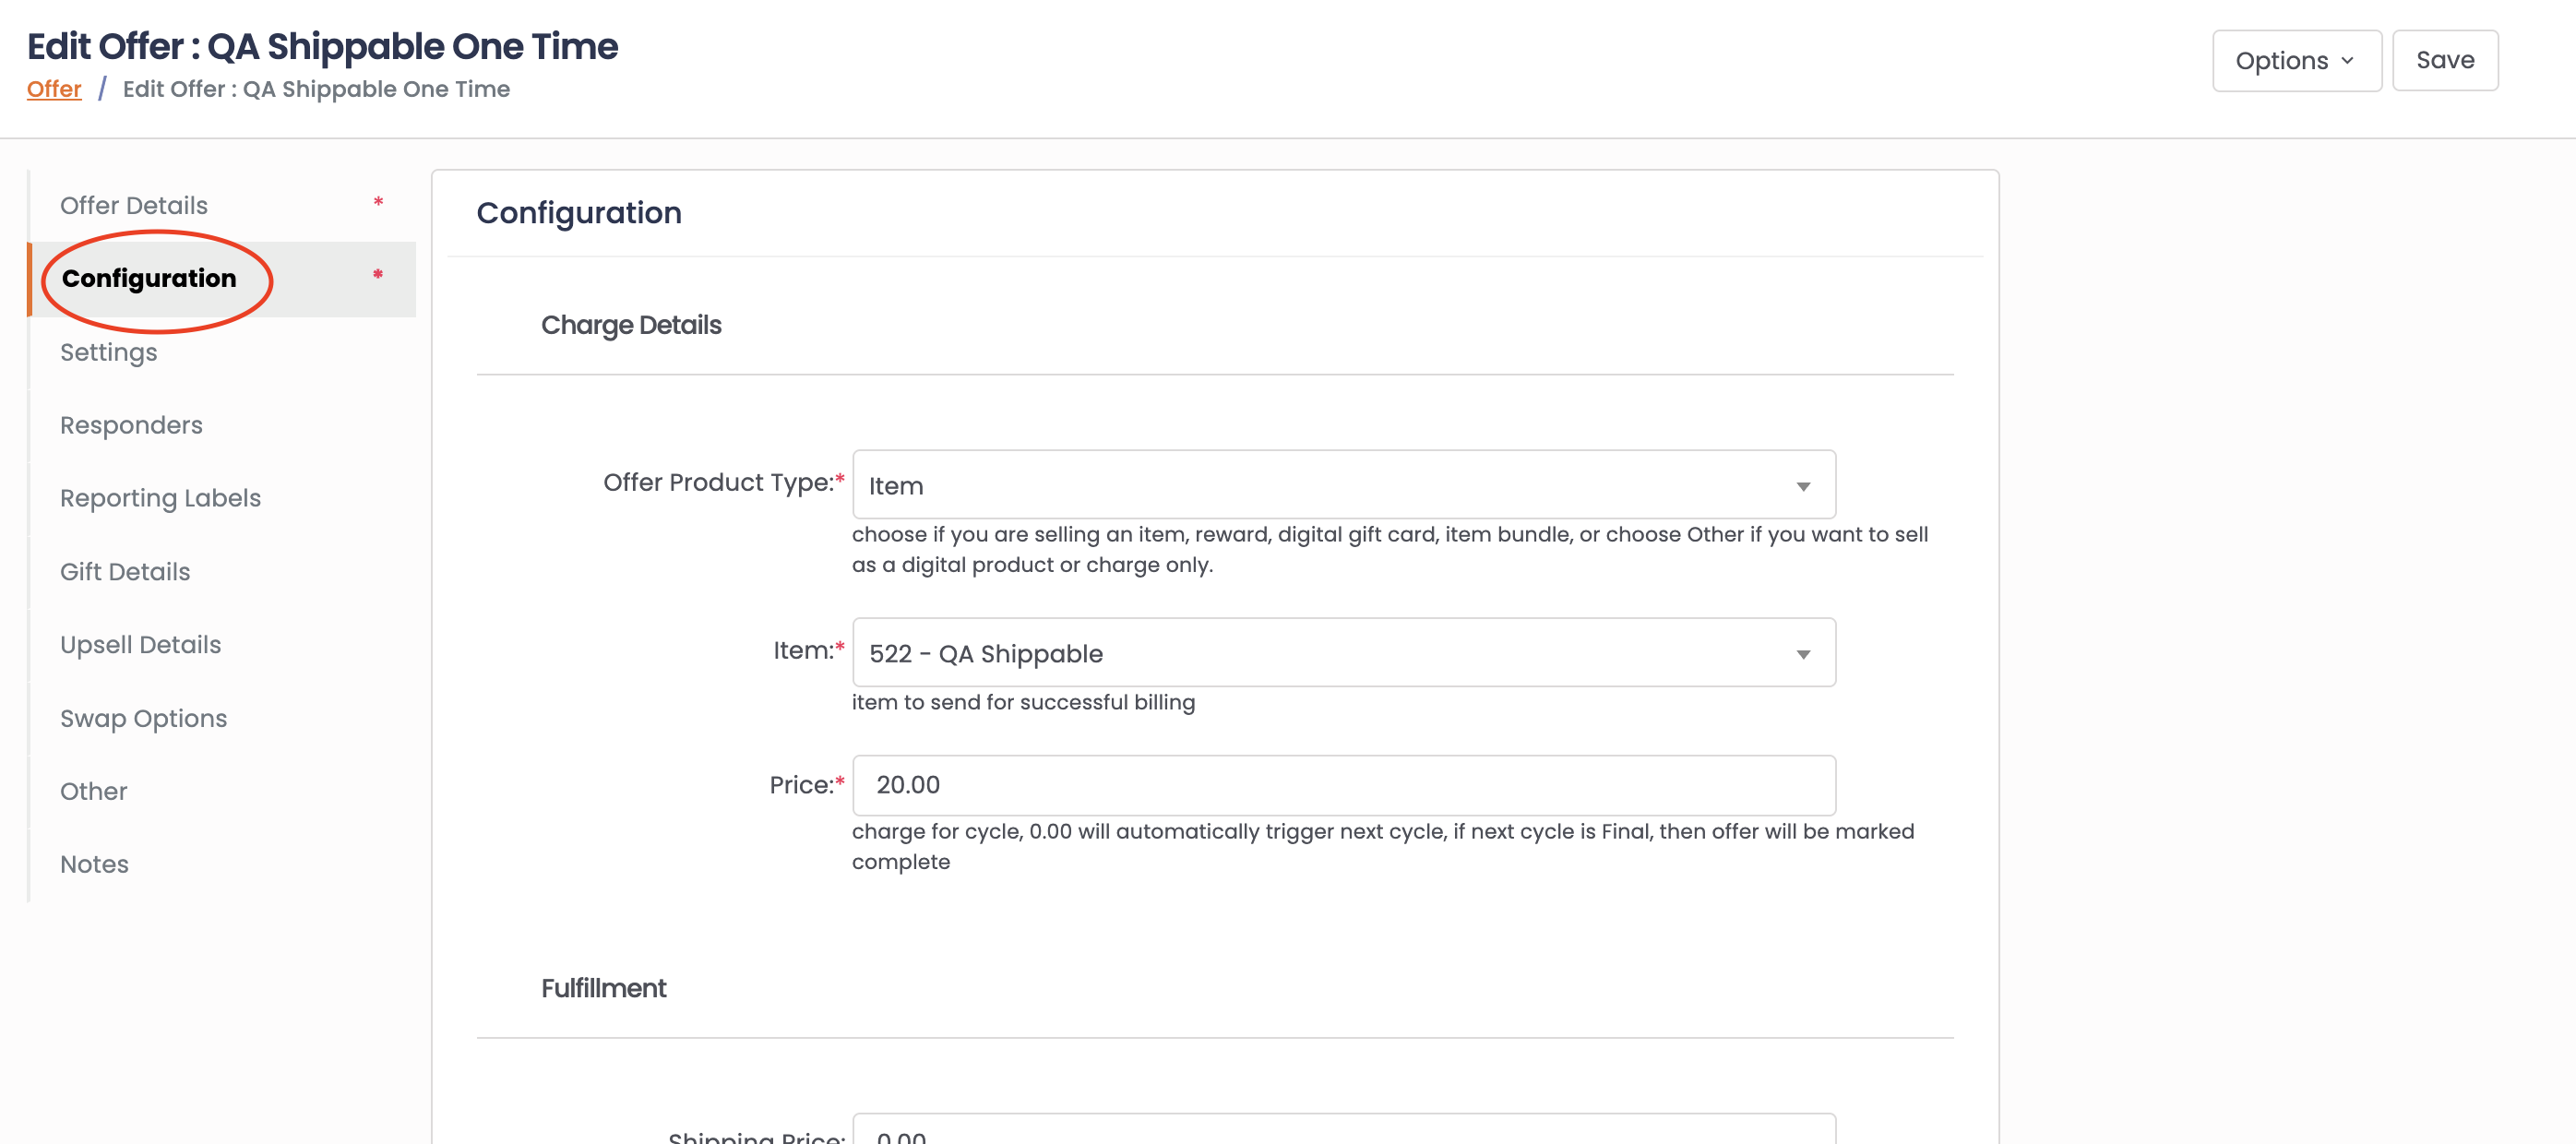
One Time Offers
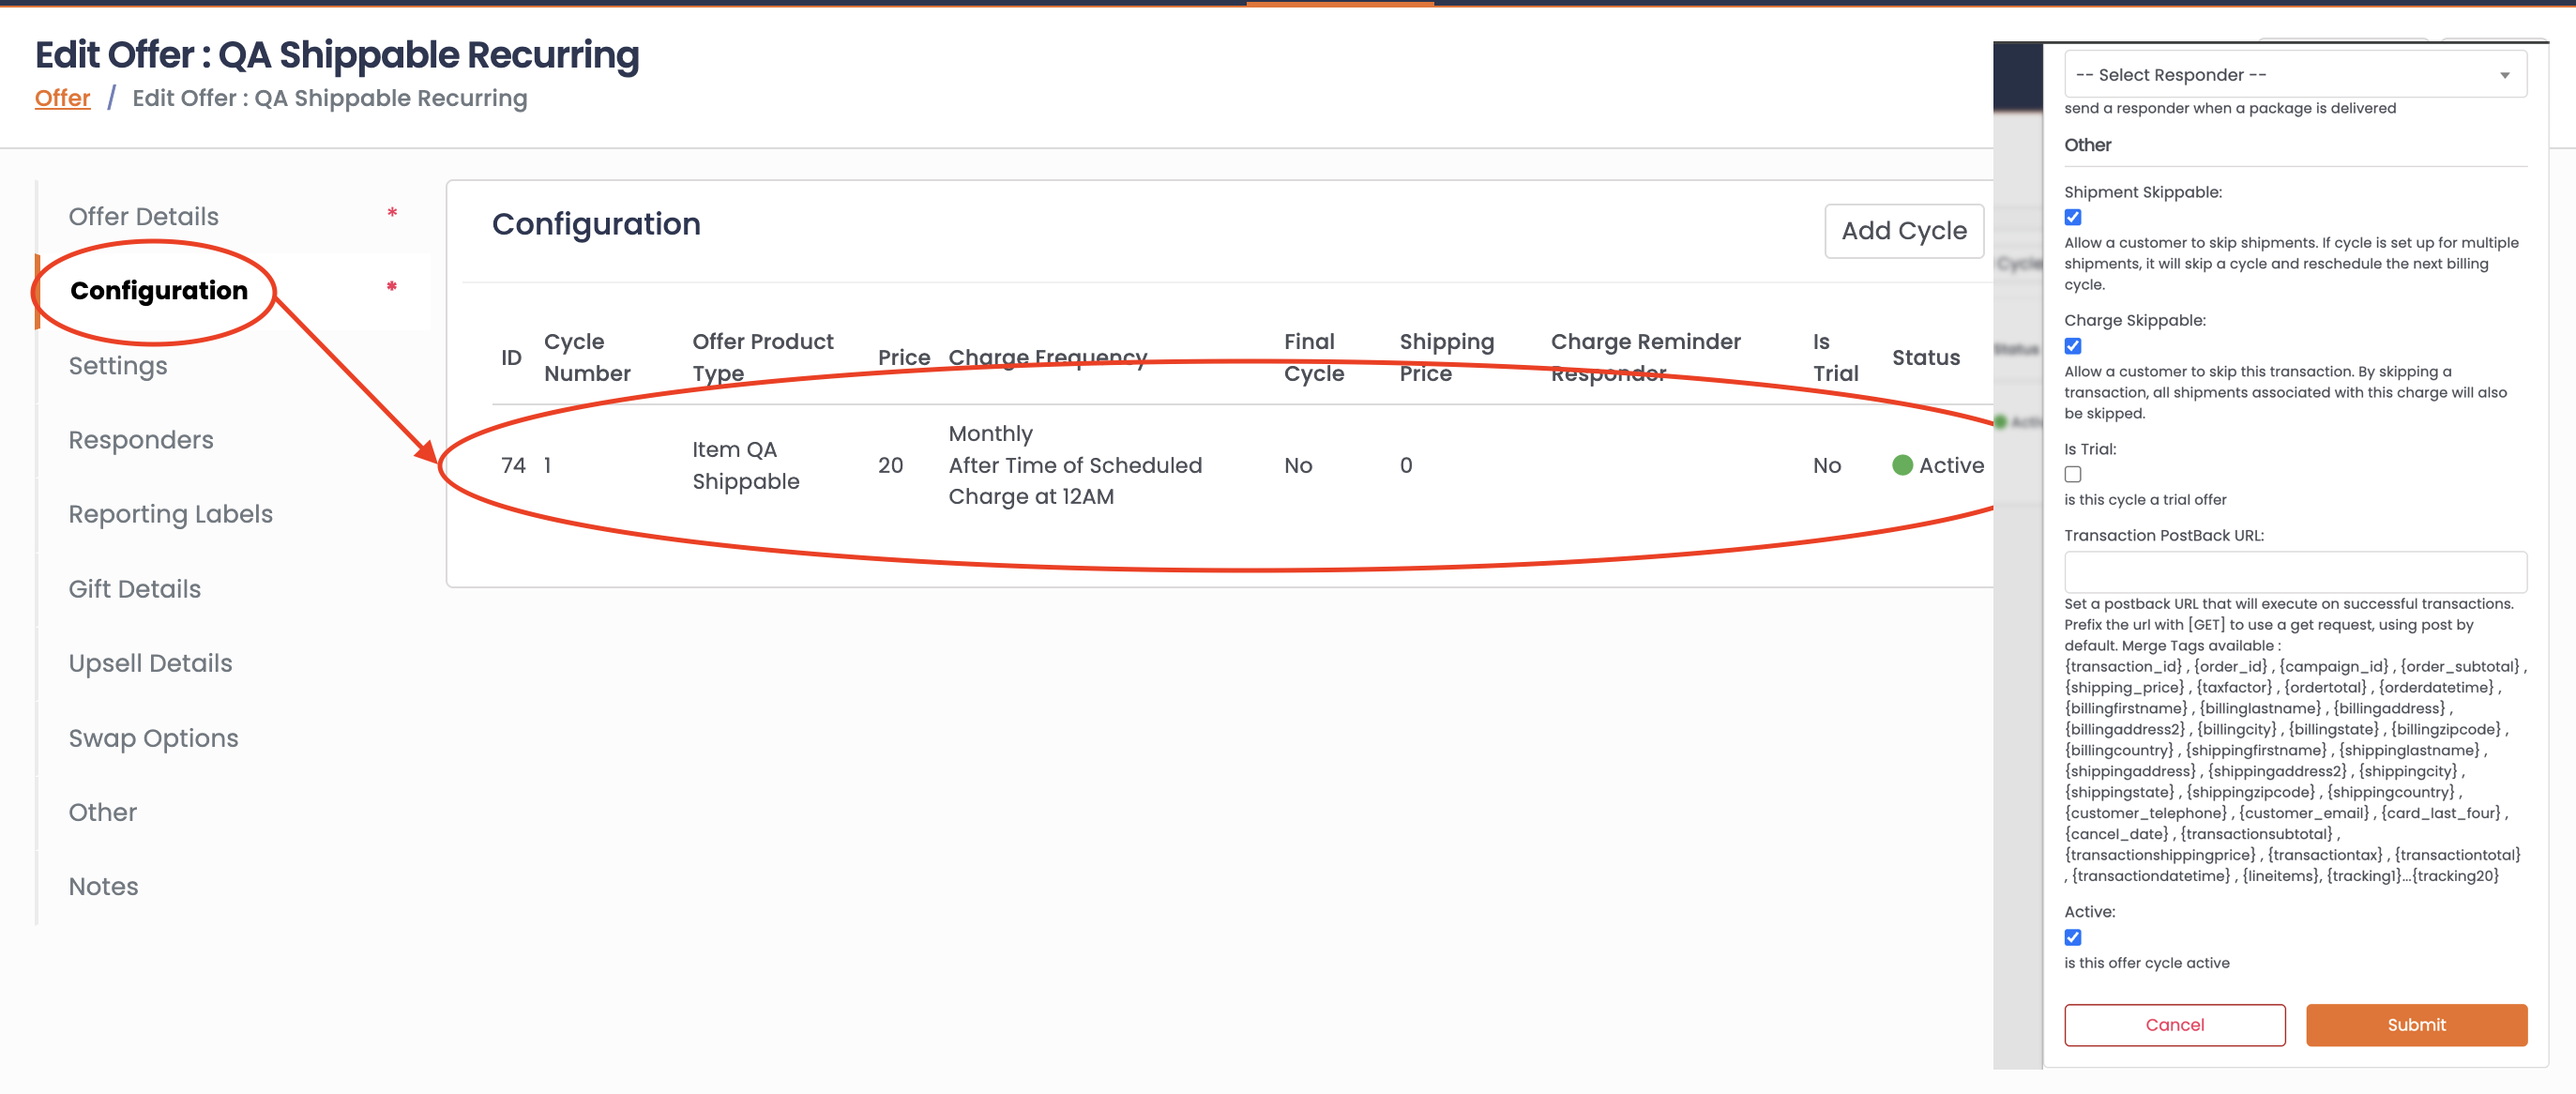
Recurring Offers / Offer Cycles
Why Use Postback Pixels?
- Real-time Notifications: Get instant updates when transactions occur
- Automated Data Flow: Eliminate manual data entry between systems
- Better Tracking: Keep all your business tools in sync automatically
- Improved Analytics: Get comprehensive data across all your platforms
- Affiliate Management: Automatically notify affiliate networks of conversions
How to Set Up Postback Pixels
The setup process varies depending on which type of postback pixel you want to configure:
Campaign Level Postbacks
- Navigate to your campaign in the VRIO dashboard
- Edit the campaign configuration
- Locate the "Pixel Block" field (
campaign_pixel_block) - Enter your postback URL with merge tags
- Set the pixel type (Server to Server recommended for postbacks)
- Save your campaign settings
Campaign Tracking Pixels (Conditional Postbacks)
- Navigate to your campaign in the VRIO dashboard
- Click on the campaign you want to configure
- Look for the "Tracking Pixels" section
- Click "Add Tracking Pixel"
- Configure your pixel settings:
- Tracking Key: Select which tracking variable to match (tracking1, tracking2, etc.)
- Tracking Value: Enter the exact value to match
- Pixel Type: Choose "Server to Server" for postbacks
- Postback URL: Enter your postback URL with merge tags
- Weight: Set priority (lower number = higher priority)
- Save your settings
Offer Level Postbacks
- Navigate to your offer configuration
- Edit the specific offer
- Configure the appropriate postback URL fields:
- Cancellation:
offer_cancel_postback_url - Reactivation:
offer_reactivate_postback_url - Expiration:
offer_expire_postback_url
- Cancellation:
- Enter your postback URLs with merge tags
- Save your offer settings
Transaction Level Postbacks
- Navigate to your offer configuration
- Edit the specific offer cycle
- Locate the "Transaction Postback URL" field (
transaction_postback_url) - Enter your postback URL with merge tags
- Save your offer cycle settings
Testing Your Configuration
- Use the appropriate "View" option to verify your settings
- Make a test transaction to ensure the postback is working
- Check your external system to confirm data is being received
- Review postback logs in VRIO to verify successful delivery
Configuration Options
Pixel Types
Postback Pixels (Recommended)
- Sends data directly to your external system via HTTP request
- More reliable than display pixels
- Better for automation and data integration
Display Pixels
- Shows tracking code on customer's browser
- Useful for client-side tracking
- Good for analytics platforms that require browser-based tracking
URL Configuration
Your postback URL is where VRIO will send the transaction data. This should be a URL provided by your external system (CRM, analytics platform, etc.).
Example URLs:
https://your-crm.com/api/conversionhttps://analytics.yoursite.com/trackhttps://affiliate-network.com/postback
Available Data Variables
You can include dynamic data in your postback URLs using special variables (called "merge tags"). These variables will be automatically replaced with actual customer and transaction data.
Transaction Information
{transaction_id}- Unique transaction identifier{transactiontotal}- Total amount of the transaction{transactiondatetime}- When the transaction occurred{transactionsubtotal}- Subtotal before tax and shipping{transactionshippingprice}- Shipping cost{transactiontax}- Tax amount
Order Information
{order_id}- Unique order identifier{ordertotal}- Total order amount{orderdatetime}- When the order was placed{order_subtotal}- Order subtotal{campaign_id}- Campaign identifier
Customer Information
{customer_email}- Customer's email address{customer_telephone}- Customer's phone number{billingfirstname}- Billing first name{billinglastname}- Billing last name{billingaddress}- Billing street address{billingcity}- Billing city{billingstate}- Billing state/province{billingzipcode}- Billing ZIP/postal code{billingcountry}- Billing country
Shipping Information
{shippingfirstname}- Shipping first name{shippinglastname}- Shipping last name{shippingaddress}- Shipping street address{shippingcity}- Shipping city{shippingstate}- Shipping state/province{shippingzipcode}- Shipping ZIP/postal code{shippingcountry}- Shipping country
Payment Information
{card_last_four}- Last four digits of credit card
Tracking Information
{tracking1}through{tracking20}- Custom tracking parameters you can use for additional data
Example Configurations by Type
Campaign Level Postback
Use Case: General conversion tracking for all orders in a campaign
https://your-analytics.com/conversion?order_id={order_id}&amount={ordertotal}&email={customer_email}&campaign_id={campaign_id}Campaign Tracking Pixel (Conditional)
Use Case: Affiliate-specific tracking based on traffic source
Configuration:
- Tracking Key: tracking1
- Tracking Value: affiliate_partner_123
- Postback URL: https://affiliate-network.com/postback?transaction_id={transaction_id}&amount={transactiontotal}&email={customer_email}&partner_id=123&date={transactiondatetime}
Offer Level Postbacks
Use Case: Subscription lifecycle events
Cancellation Postback:
https://your-crm.com/api/cancel?subscription_id={order_offer_id}&customer_email={customer_email}&cancel_date={date_cancel}&reason={cancel_type_id}Reactivation Postback:
https://your-crm.com/api/reactivate?subscription_id={order_offer_id}&customer_email={customer_email}&offer_id={offer_id}Expiration Postback:
https://your-crm.com/api/expire?subscription_id={order_offer_id}&customer_email={customer_email}&final_amount={order_offer_price}Transaction Level Postback
Use Case: Detailed transaction tracking with comprehensive data
https://analytics.yoursite.com/transaction?transaction_id={transaction_id}&order_id={order_id}&amount={transactiontotal}&subtotal={transactionsubtotal}&tax={transactiontax}&shipping={transactionshippingprice}&customer_email={customer_email}&billing_name={billingfirstname}+{billinglastname}&card_last_four={card_last_four}&datetime={transactiondatetime}Postback Execution Priority and Flow
Understanding how different postback types work together is crucial for proper configuration:
Execution Order for Order Processing
- Campaign Tracking Pixels are checked first (tracking1 through tracking20)
- If a matching tracking pixel is found, it overrides the campaign-level postback
- If no tracking pixel matches, the Campaign Level Postback fires
- Transaction Level Postbacks fire separately for each successful transaction
- Offer Level Postbacks fire for subscription lifecycle events (separate from order processing)
Priority Rules
- Campaign Tracking Pixels have the highest priority and can completely override campaign settings
- Transaction Level Postbacks fire independently of campaign postbacks
- Offer Level Postbacks are event-specific and fire separately from transaction postbacks
- Multiple postback types can fire for the same customer action
Example Flow
Scenario: Customer makes initial purchase with tracking1=affiliate_abc
- ✅ Campaign Tracking Pixel fires (if configured for
tracking1=affiliate_abc) - ❌ Campaign Level Postback does NOT fire (overridden by tracking pixel)
- ✅ Transaction Level Postback fires (if configured on offer cycle)
- ✅ Offer Level Postbacks will fire later based on subscription events
Best Practices
URL Design
- Use HTTPS: Always use secure URLs for postback endpoints
- Test First: Test your URLs with sample data before going live
- Keep It Simple: Don't include unnecessary data in your URLs
- URL Encode: The system automatically handles special characters, but design URLs to be clean
Data Management
- Verify Data: Check that your external system is receiving the correct data
- Handle Errors: Make sure your external system can handle occasional failed requests
- Monitor Performance: Keep an eye on postback success rates
Security
- Validate Data: Always validate incoming postback data on your external system
- Use Authentication: Consider adding authentication tokens to your postback URLs
- Monitor Access: Keep track of who has access to your postback configurations
Troubleshooting
Common Issues
Postback Not Firing
- Check that your campaign has transactions occurring
- Verify the postback URL is correct and accessible
- Ensure your external system is responding quickly (within 1 second)
Missing Data
- Verify all merge tags are spelled correctly
- Check that the data exists in your transactions
- Confirm your external system is processing all the data fields
Duplicate Postbacks
- Postbacks are sent once per successful transaction
- Check if your external system is creating duplicates
- Verify transaction IDs are being used properly
Getting Help
- Use the "View Tracking Pixel" option to see your current configuration
- Check the postback logs to see request and response details
- Contact support if you need help with external system integration
Advanced Features
Multiple Postbacks
You can set up multiple postback pixels across different levels to send data to different systems simultaneously:
- Campaign Level: General conversion tracking
- Campaign Tracking Pixels: Conditional tracking based on traffic source
- Transaction Level: Detailed transaction data
- Offer Level: Subscription lifecycle events
Each type serves a different purpose and can be configured independently to work together.
Conditional Postbacks (Advanced Feature)
Configure postbacks to fire only under specific conditions using tracking variables. This powerful feature allows you to override your campaign's default postback settings based on the source of your traffic.
How It Works:
When a transaction occurs, the system checks the tracking variables (tracking1 through tracking20) against your configured tracking pixels. If a match is found, it uses the specific postback configuration instead of the campaign's default settings.
Use Cases:
- Different affiliate partners requiring different postback URLs
- Traffic sources with different commission structures
- A/B testing different tracking configurations
- Custom postbacks for specific marketing campaigns
Configuration Steps:
-
Set Up Tracking Variables
- Configure your traffic sources to pass tracking parameters
- Example:
https://yoursite.com/checkout?tracking1=affiliate123&tracking2=campaign456
-
Create Conditional Postback Pixels
- Navigate to your campaign's tracking pixels section
- Click "Add Tracking Pixel"
- Configure the following:
- Tracking Key: Select which tracking variable to match (tracking1, tracking2, etc.)
- Tracking Value: Enter the exact value to match (e.g., "affiliate123")
- Pixel Type: Choose "Server to Server" for postbacks
- Postback URL: Enter the specific URL for this condition
- Weight: Set priority (lower number = higher priority)
- CPA Override: Optionally override the campaign's default CPA value
- Offer Filtering: Optionally limit to specific offers
- Firing Percentage: Set what percentage of matching transactions should fire
-
Priority System
- If multiple tracking pixels match, the system uses the one with the lowest weight (highest priority)
- The system checks tracking1 through tracking20 in order
- Once a match is found, it stops checking and uses that pixel configuration
Example Scenarios:
Scenario 1: Different Affiliate Partners
Campaign Default: https://default-tracking.com/conversion?order={order_id}

Affiliate A (tracking1=affiliate_a):
- Postback URL: https://affiliate-a.com/postback?order_id={order_id}&commission=15
- CPA Override: $15.00

Affiliate B (tracking1=affiliate_b):
- Postback URL: https://affiliate-b.com/track?ref={order_id}&amount={ordertotal}
- CPA Override: $12.50
Scenario 2: Traffic Source Segmentation
Campaign Default: https://analytics.com/conversion?order={order_id}

Google Ads (tracking2=google):
- Postback URL: https://googleads.com/conversion?gclid={tracking3}&value={ordertotal}
- Firing Percentage: 100%

Facebook Ads (tracking2=facebook):
- Postback URL: https://graph.facebook.com/events?fbclid={tracking3}&value={ordertotal}
- Firing Percentage: 100%

Organic Traffic (tracking2=organic):
- Postback URL: https://analytics.com/organic?order={order_id}
- Firing Percentage: 50%
Scenario 3: A/B Testing
Test A (tracking4=test_a):
- Postback URL: https://test-platform.com/conversion?test=a&order={order_id}
- Firing Percentage: 100%

Test B (tracking4=test_b):
- Postback URL: https://test-platform.com/conversion?test=b&order={order_id}
- Firing Percentage: 100%

Control Group (tracking4=control):
- Postback URL: https://test-platform.com/conversion?test=control&order={order_id}
- Firing Percentage: 50%
Advanced Configuration Tips:
- Wildcard Matching: Currently not supported - values must match exactly
- Multiple Conditions: Each tracking pixel can only match one tracking variable
- Fallback Behavior: If no tracking pixels match, the campaign's default pixel fires
- Override Capabilities: Conditional pixels can override:
- Postback URL
- CPA value
- Pixel type (server-to-server vs. HTML)
- Firing percentage
Best Practices:
- Test Thoroughly: Always test your conditional logic with sample transactions
- Document Your Setup: Keep track of which tracking variables are used for what
- Monitor Performance: Check your postback logs to ensure conditional pixels are firing correctly
- Use Descriptive Names: Include notes in your pixel configurations to remember their purpose
- Set Appropriate Weights: Use weight values that make sense for your priority needs
Troubleshooting Conditional Postbacks:
- Pixel Not Firing: Check that the tracking variable value matches exactly (case-sensitive)
- Wrong Pixel Firing: Review your weight settings and ensure priorities are correct
- Multiple Pixels Firing: The system should only fire the first match - check your configuration
- Default Pixel Not Working: Ensure your campaign has a default pixel configured
This conditional postback system gives you incredible flexibility to customize your tracking based on traffic source, affiliate partner, or any other criteria you can pass through tracking variables.
Custom Tracking
Use the 20 available tracking variables ({tracking1} through {tracking20}) to pass custom data specific to your business needs.
Integration Examples
Google Analytics Enhanced Ecommerce
https://www.google-analytics.com/collect?v=1&tid=UA-XXXXX-Y&cid={customer_email}&t=transaction&ti={order_id}&ta=YourStore&tr={ordertotal}&ts={shipping_price}&tt={transactiontax}Facebook Conversions API
https://graph.facebook.com/v12.0/{pixel_id}/events?access_token=YOUR_TOKEN&data=[{"event_name":"Purchase","event_time":{unix_timestamp},"user_data":{"email":"{customer_email}"},"custom_data":{"currency":"USD","value":"{ordertotal}"}}]Salesforce Lead Creation
https://webto.salesforce.com/servlet/servlet.WebToLead?oid=YOUR_ORG_ID&email={customer_email}&first_name={billingfirstname}&last_name={billinglastname}&phone={customer_telephone}&company=CustomerRemember: The key to successful postback pixel implementation is testing. Always test your configurations with sample data before deploying to production campaigns.