Adding a Store
Step-by-step guide to connect your Shopify store with Vrio using our custom app, including Partner account setup and configuration.
Adding your Store
To add the custom Vrio app to your store, please follow the below instructions:
-
Add your store to your partner account. Don't have a partner account? Create a free Partner account here. Note - you may not use the same email to create a partner store as your Shopify store.
-
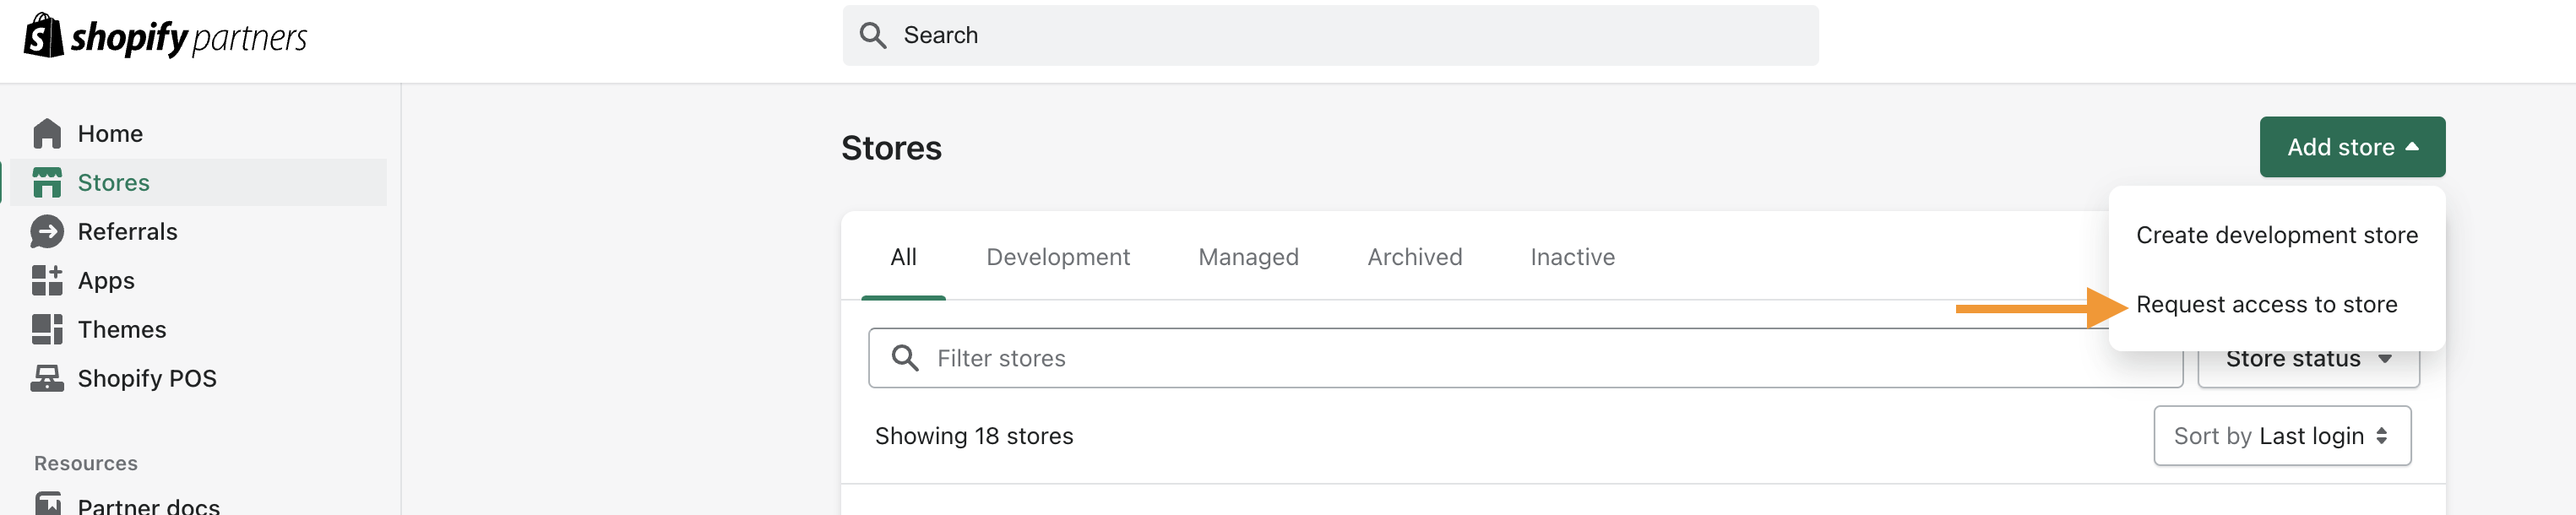
Select Add Store and Request access to the shop domain you want to install the app on. Include the myshopify.com portion ( not the store domain if its different ). Example custom-hats-for-sale.myshopify.com
-
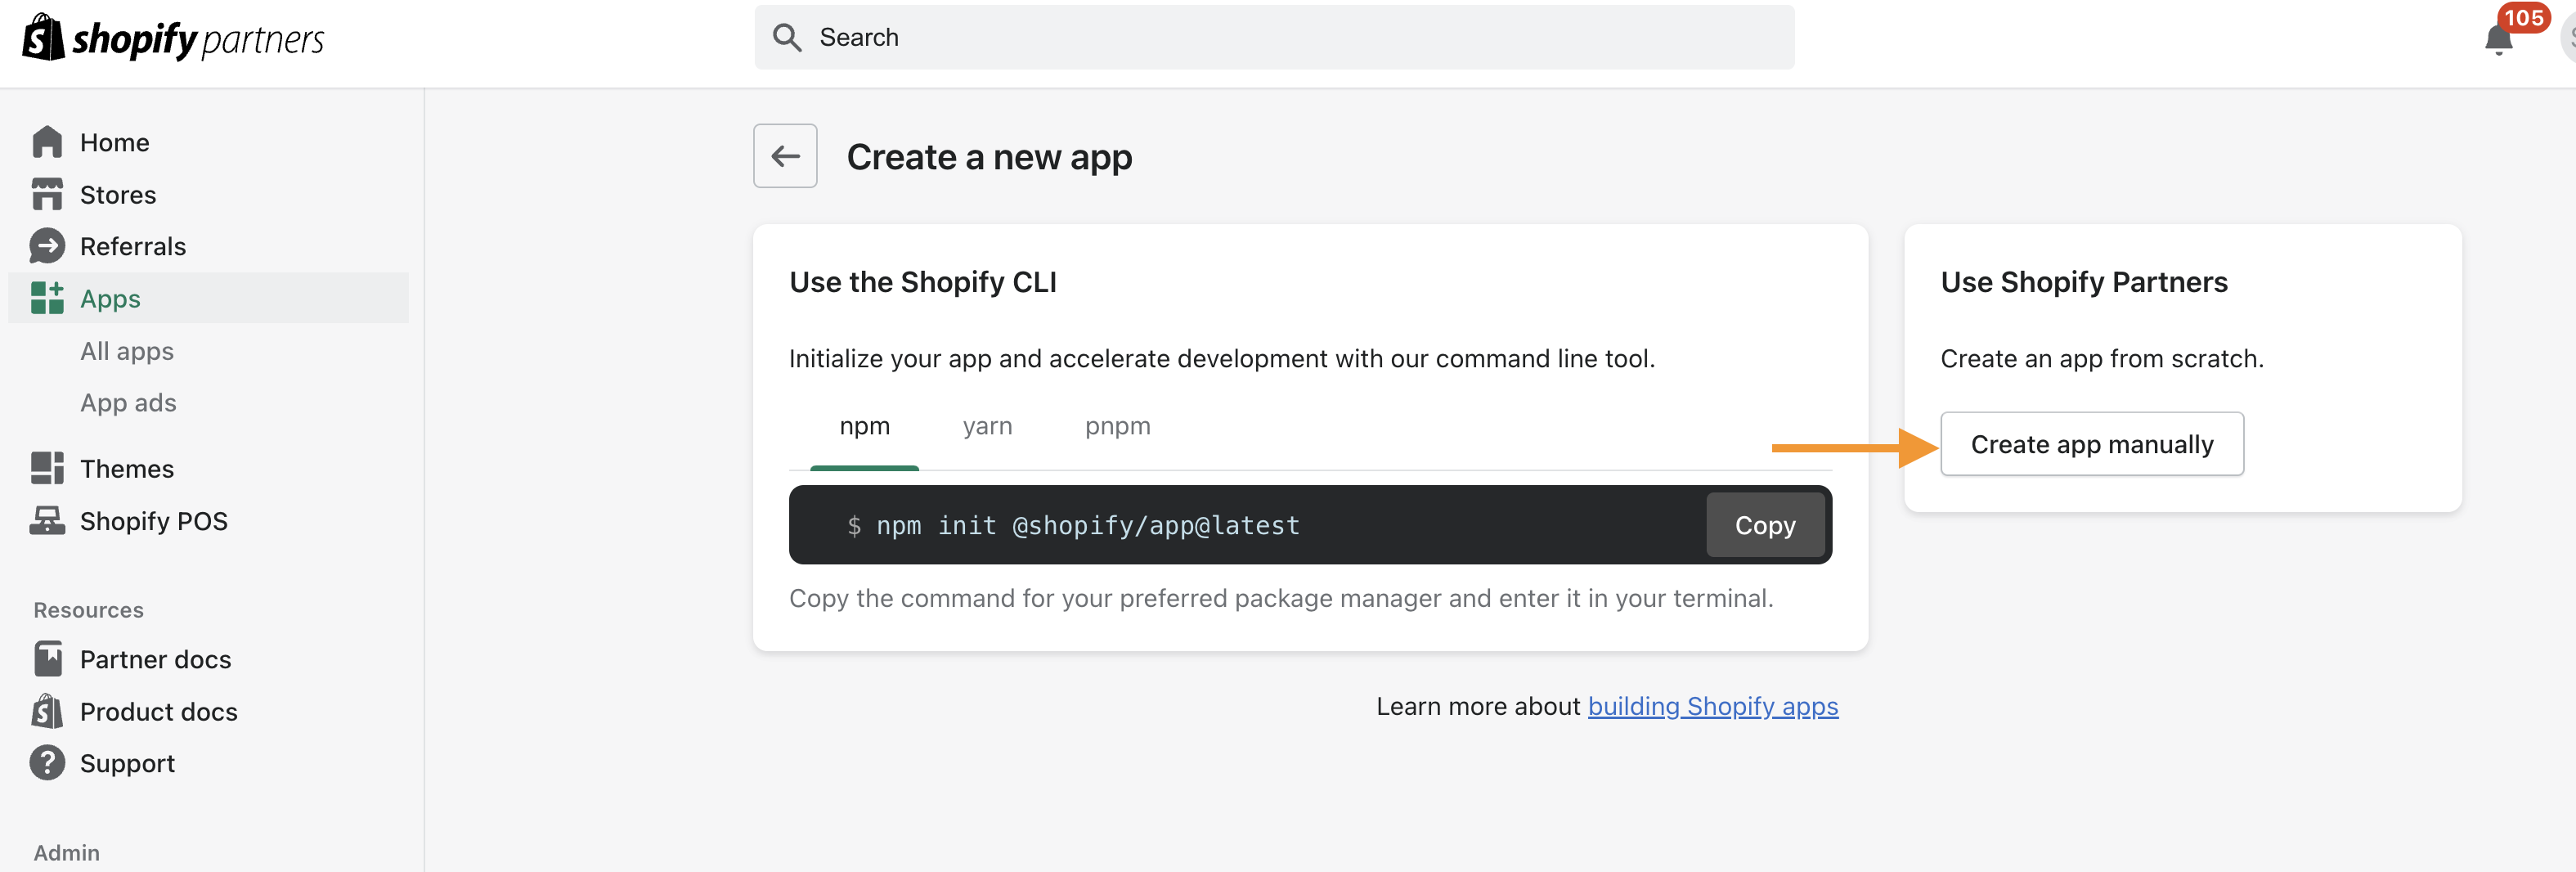
Go to the Partner Dashboard under Apps and create a new App.

-
Click on Create App Manually
-
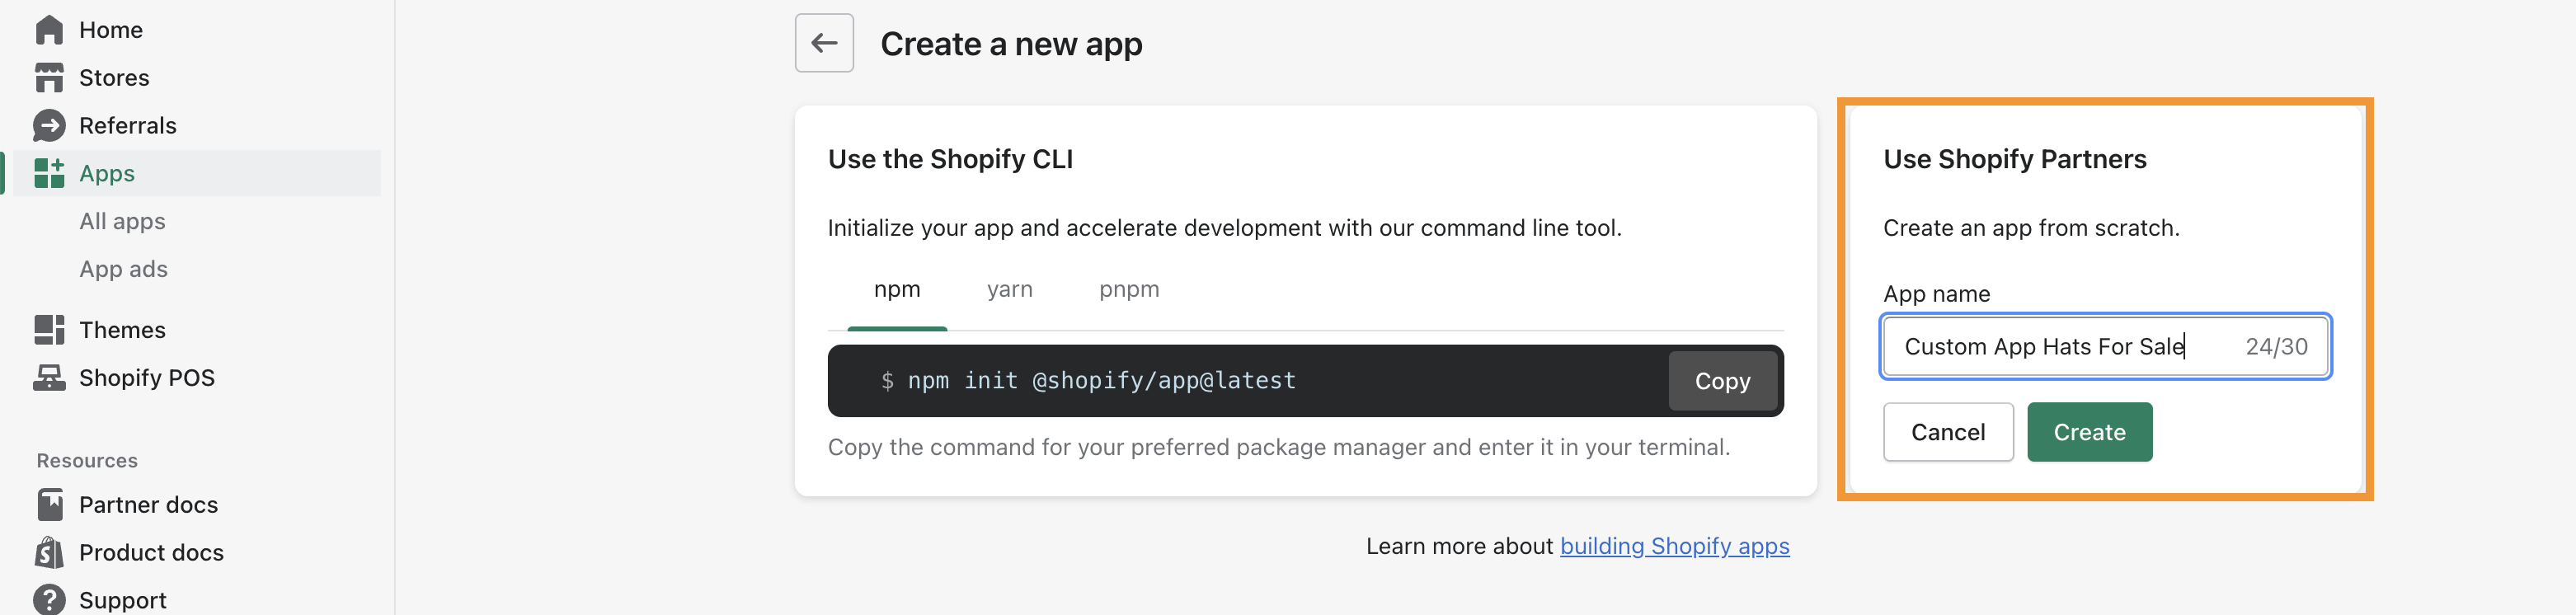
Name the App. This can be named anything that you wish. Example : Custom App Hats For Sale
-
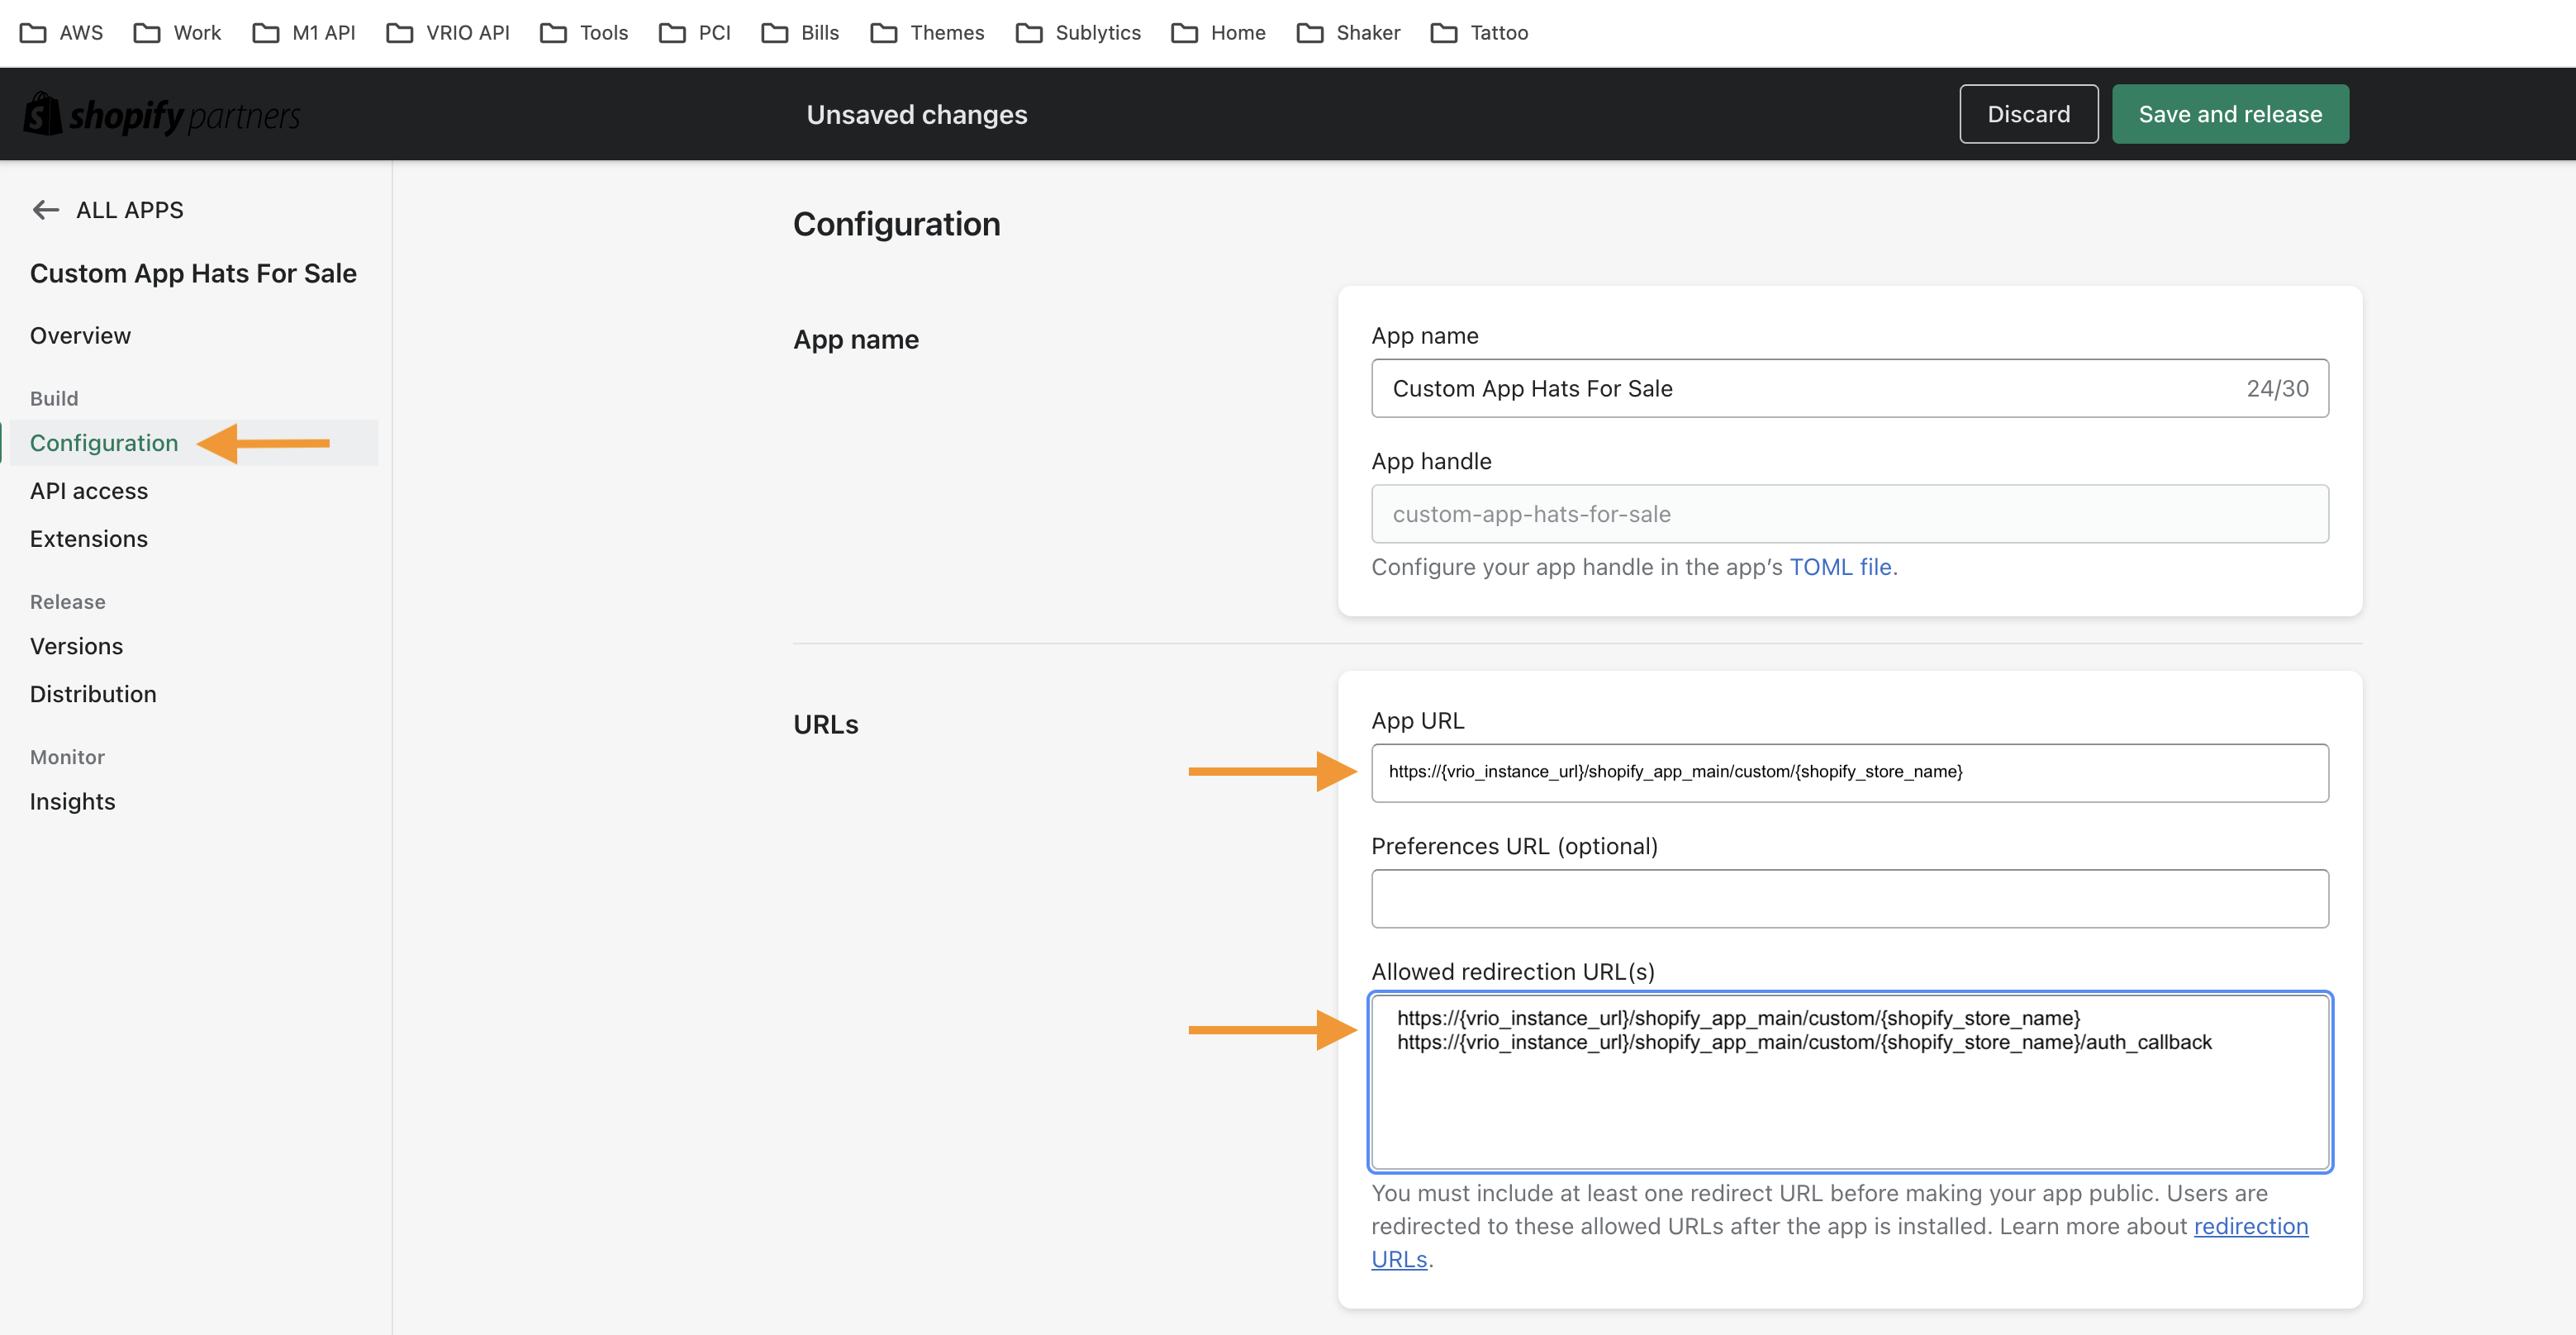
Configure the App URLs by clicking on Configuration under the Build section
-
Under APP URL put
https://{YOUR VRIO INSTANCE URL}/shopify_app_main/custom/{YOUR SHOPIFY STORE NAME}(change "YOUR VRIO INSTANCE URL" with your own instance name)
for example in the case of custom-hats-for-sale.myshopify.com we will use this if its connecting to our demo account. https://demo.vrio.app/shopify_app_main/custom/custom-hats-for-sale(change "demo" with your own instance name and change "custom-hats-for-sale" with your shopify store name) -
Under Allowed redirection URL(s), we will insert like this
https://{YOUR VRIO INSTANCE URL}/shopify_app_main/custom/{YOUR SHOPIFY STORE NAME}
https://{YOUR VRIO INSTANCE URL}/shopify_app_main/custom/{YOUR SHOPIFY STORE NAME}/auth_callback
for example in the case of http://custom-hats-for-sale.myshopify.com we will use this if its connecting to our demo account.
https://demo.vrio.app/shopify_app_main/custom/custom-hats-for-sale
https://demo.vrio.app/shopify_app_main/custom/custom-hats-for-sale/auth_callback -
Next under App Proxy, click the Set Up button
-
Subpath Prefix, select "
a" -
Subpath you will use "
_sub_" -
Proxy URL you will use:
https://_{YOUR VRIO INSTANCE URL}_/shopify_app_main/custom/_{YOUR SHOPIFY STORE NAME}_/app_proxy
for example in the case of http://custom-hats-for-sale.myshopify.com we will use this if its connecting to our demo account.
https://demo.sublytics.com/shopify_app_main/custom/custom-hats-for-sale/app_proxy
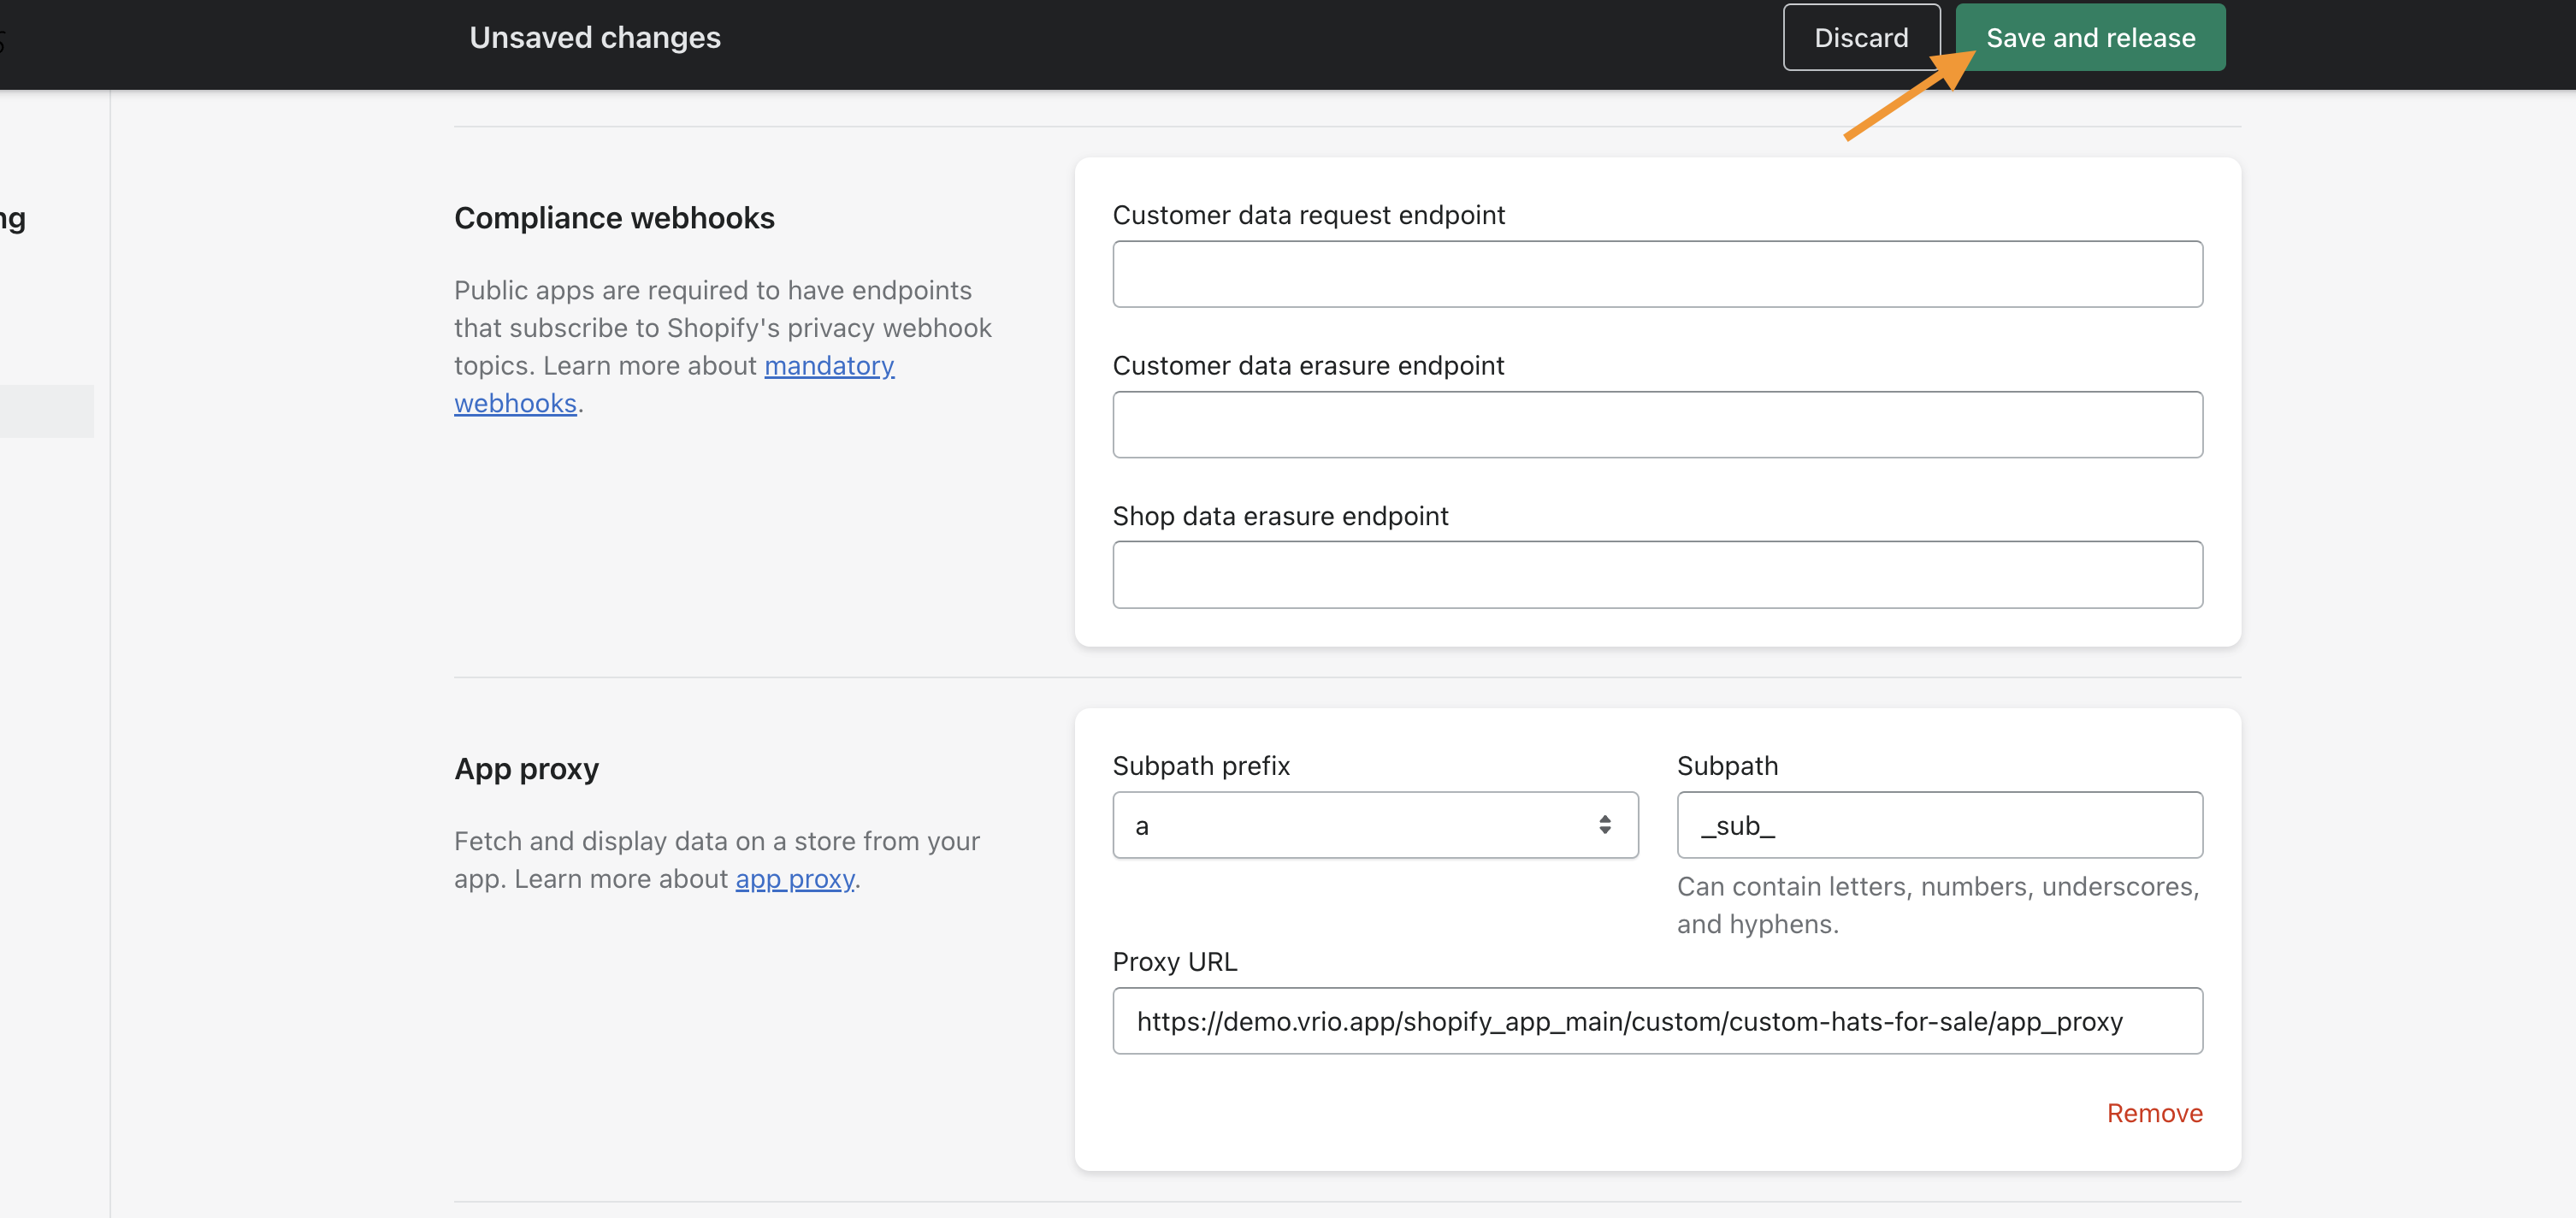
Leave all other fields as default and click Save and Release at the top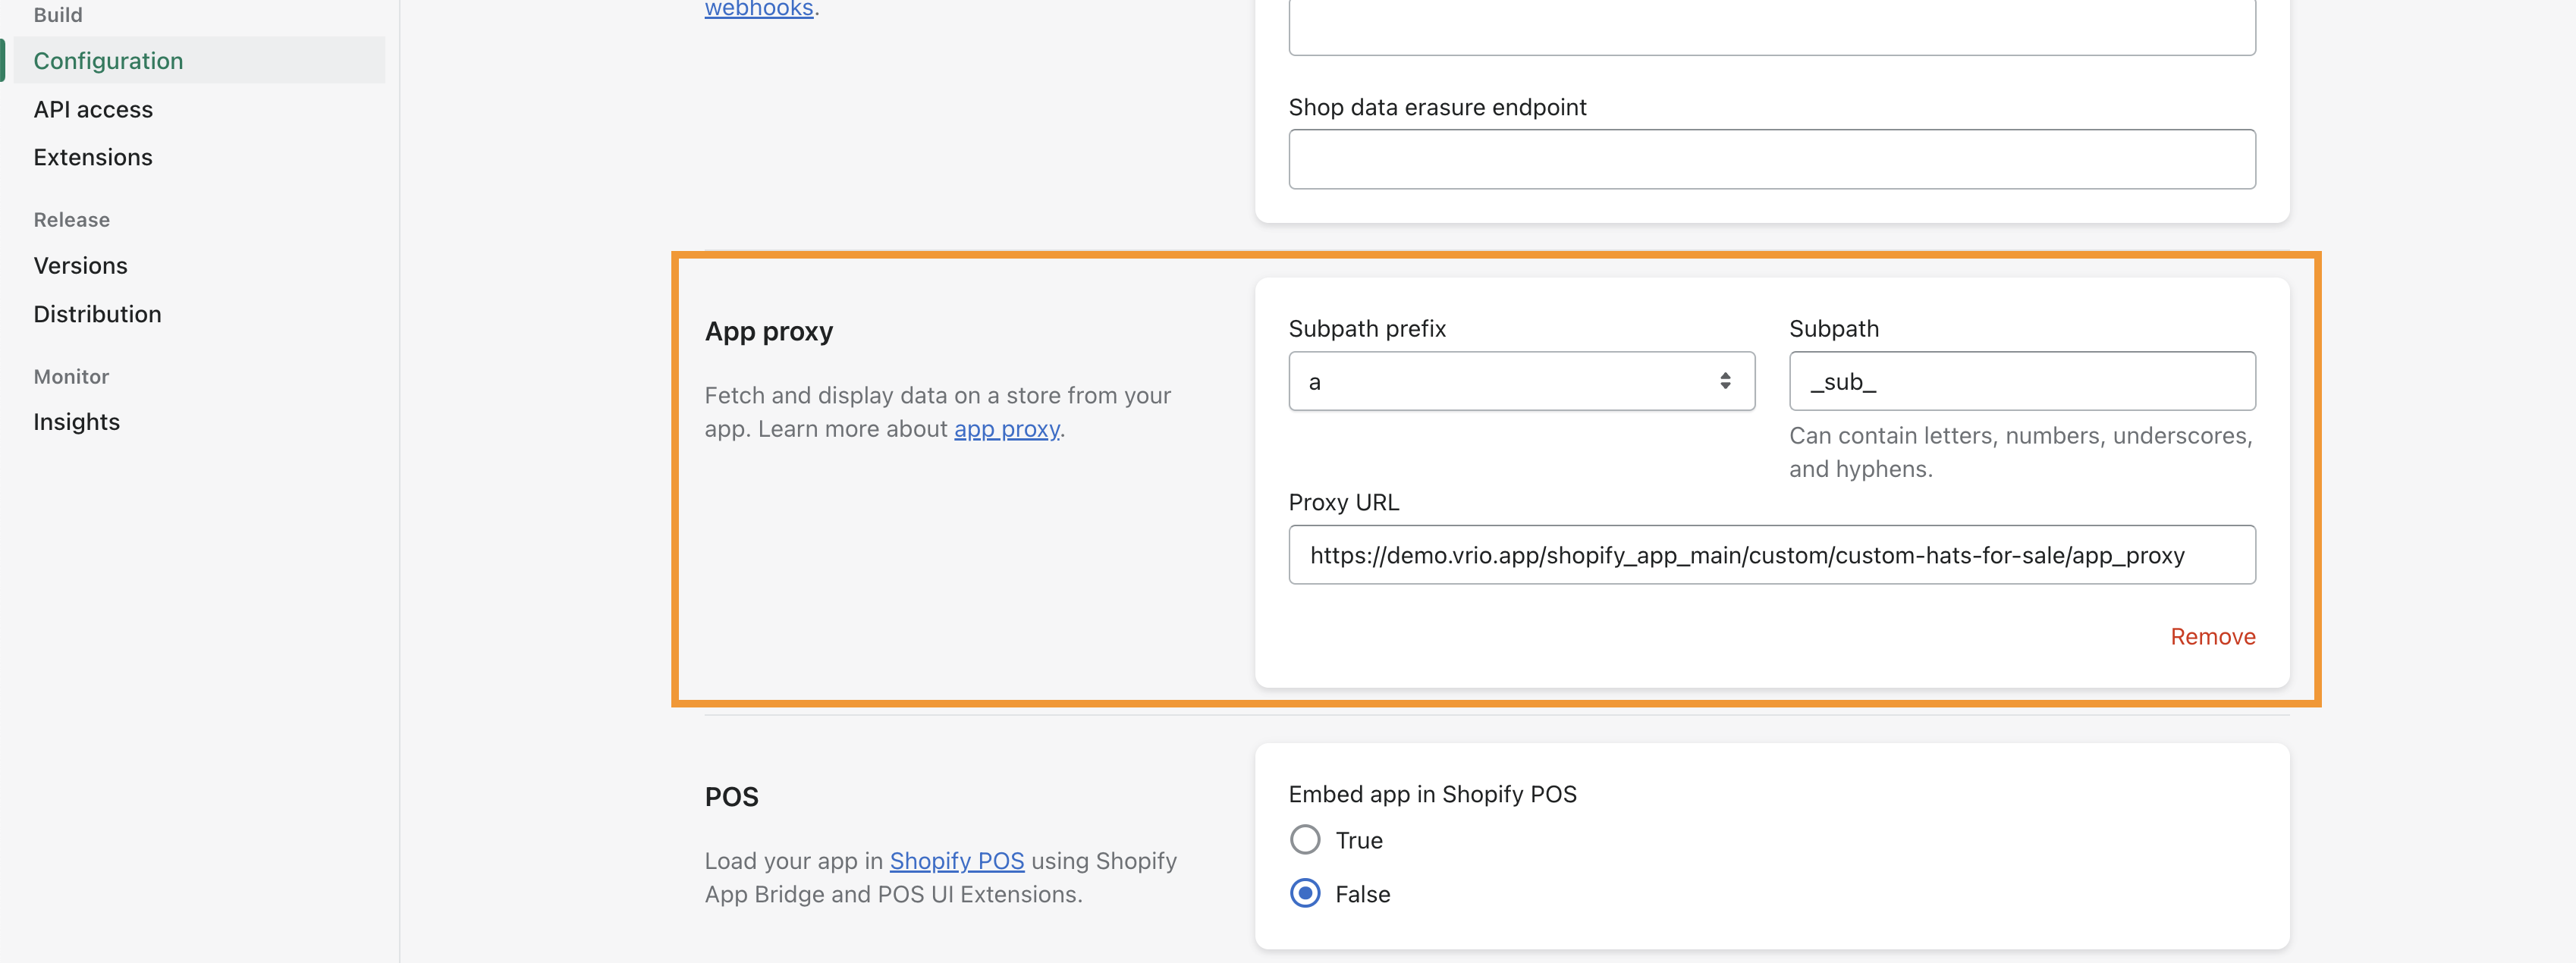
-
-
Leave all other fields as default
-
Click Save and Release at the top
-
-
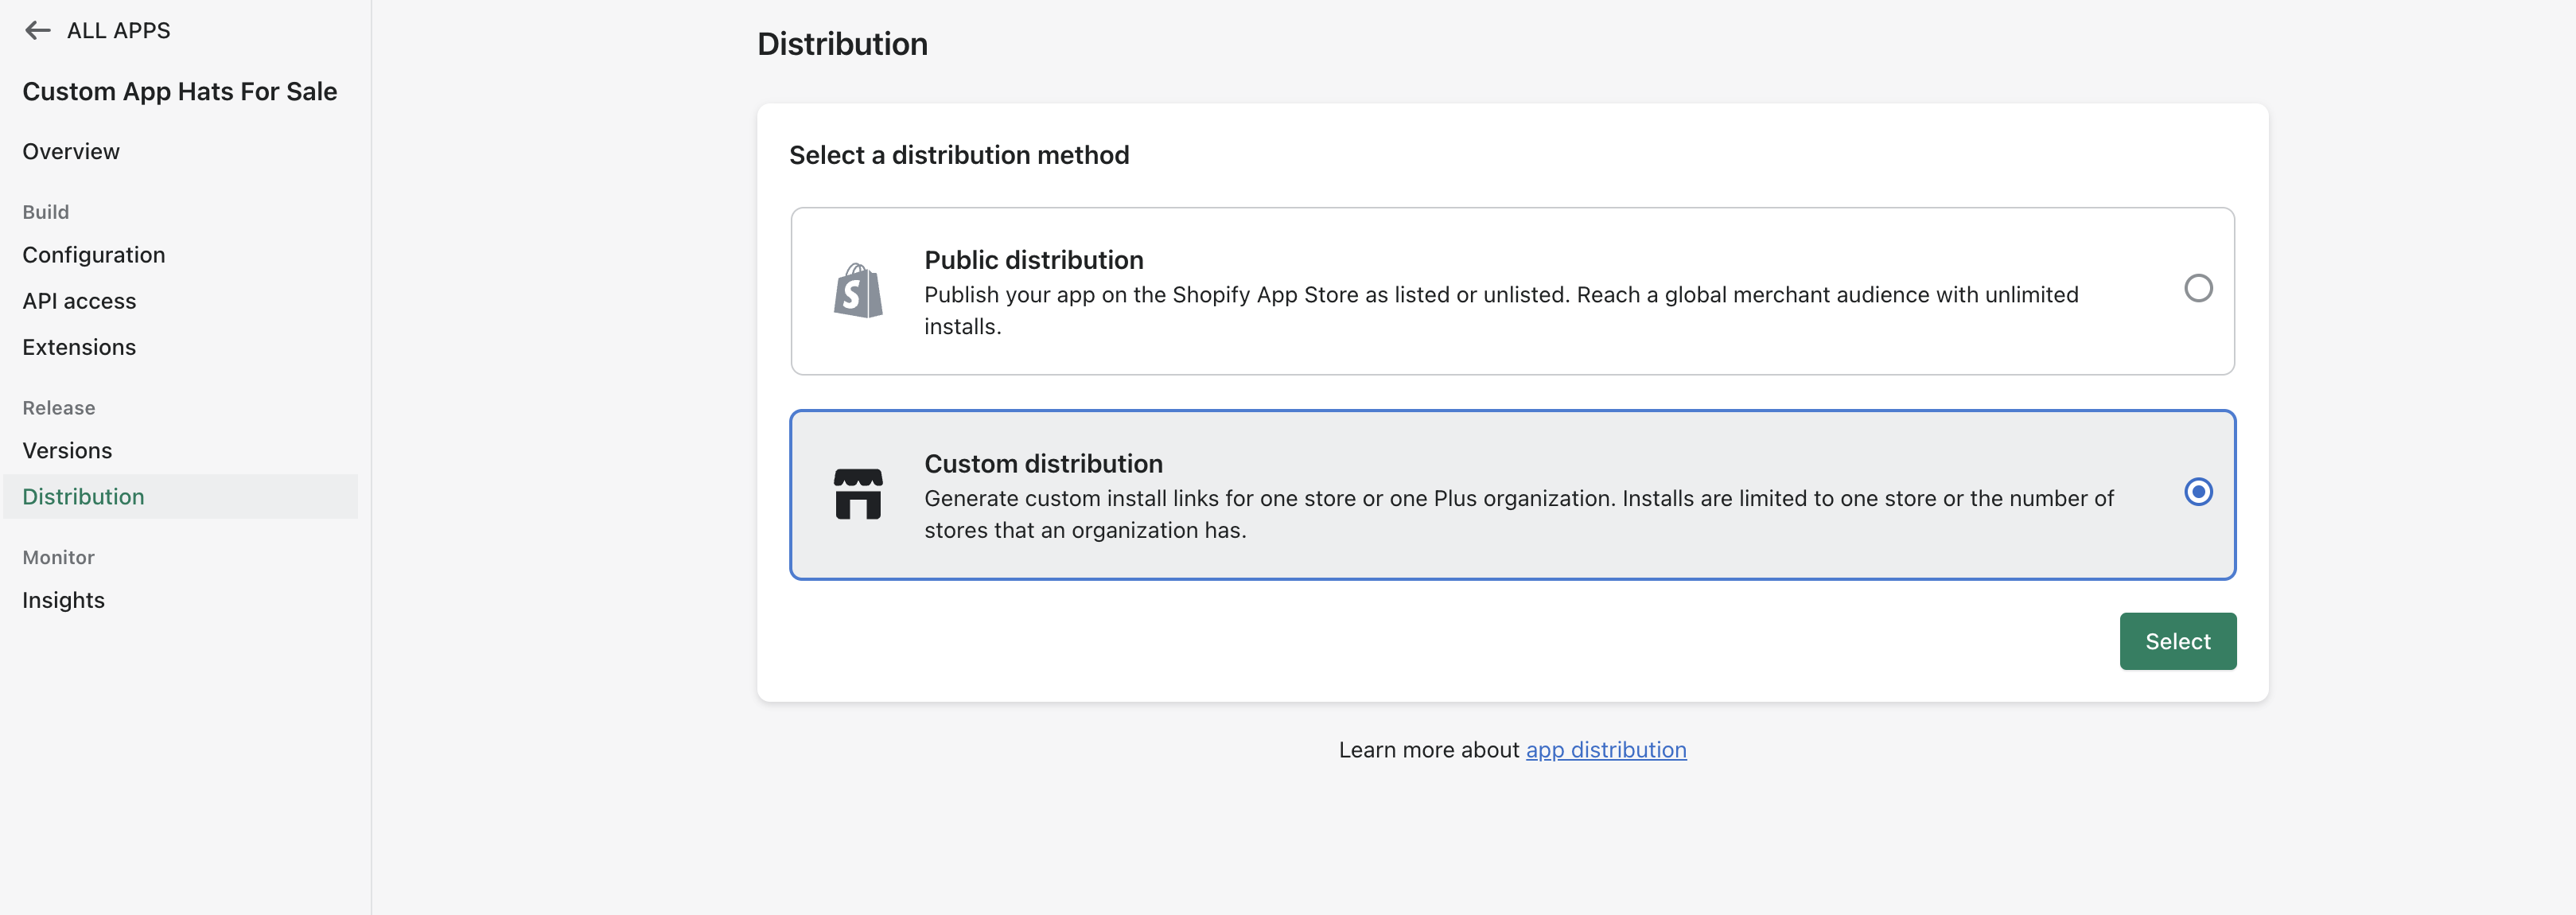
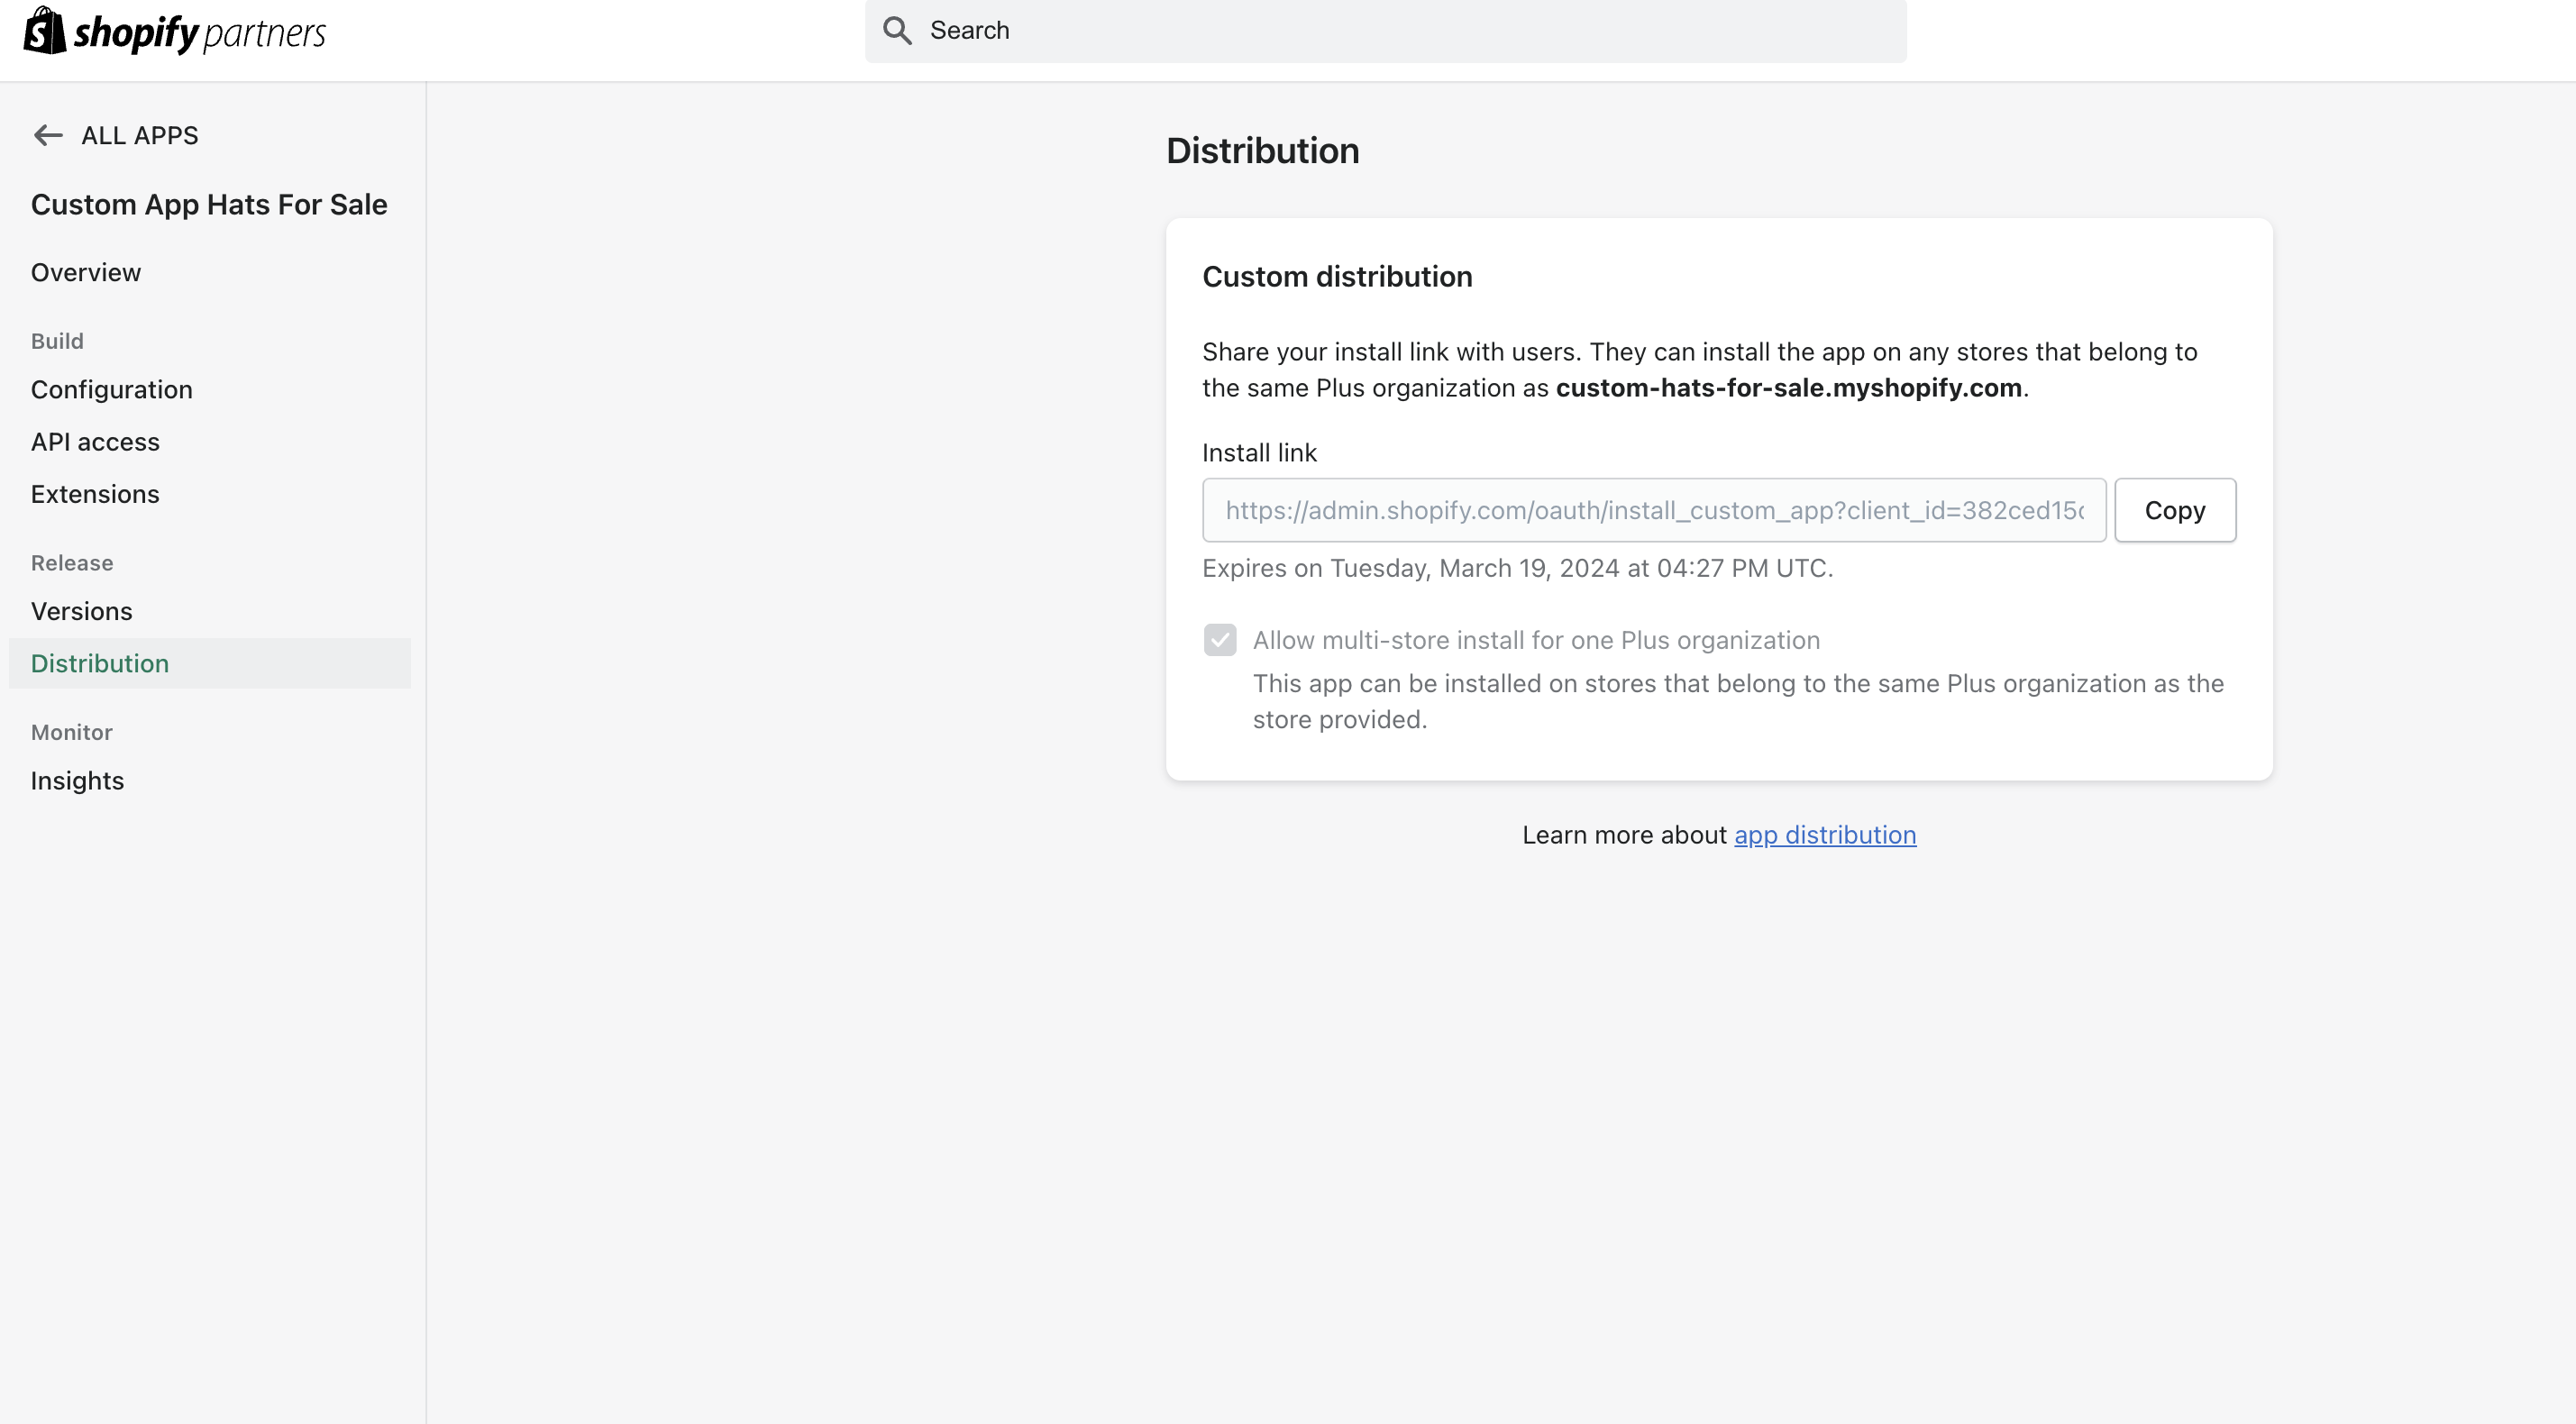
Next click on Distributionon the side tab
-
Select Custom Distribution and then click Select.
-
On the next screen you will enter your store name, keep Allow Multistore install unchecked, then click Generate Link. For example we will use: custom-hats-for-sale.myshopify.com
-
Navigate to the API Access section in the App. Leave this page open to copy the API access tokens for step
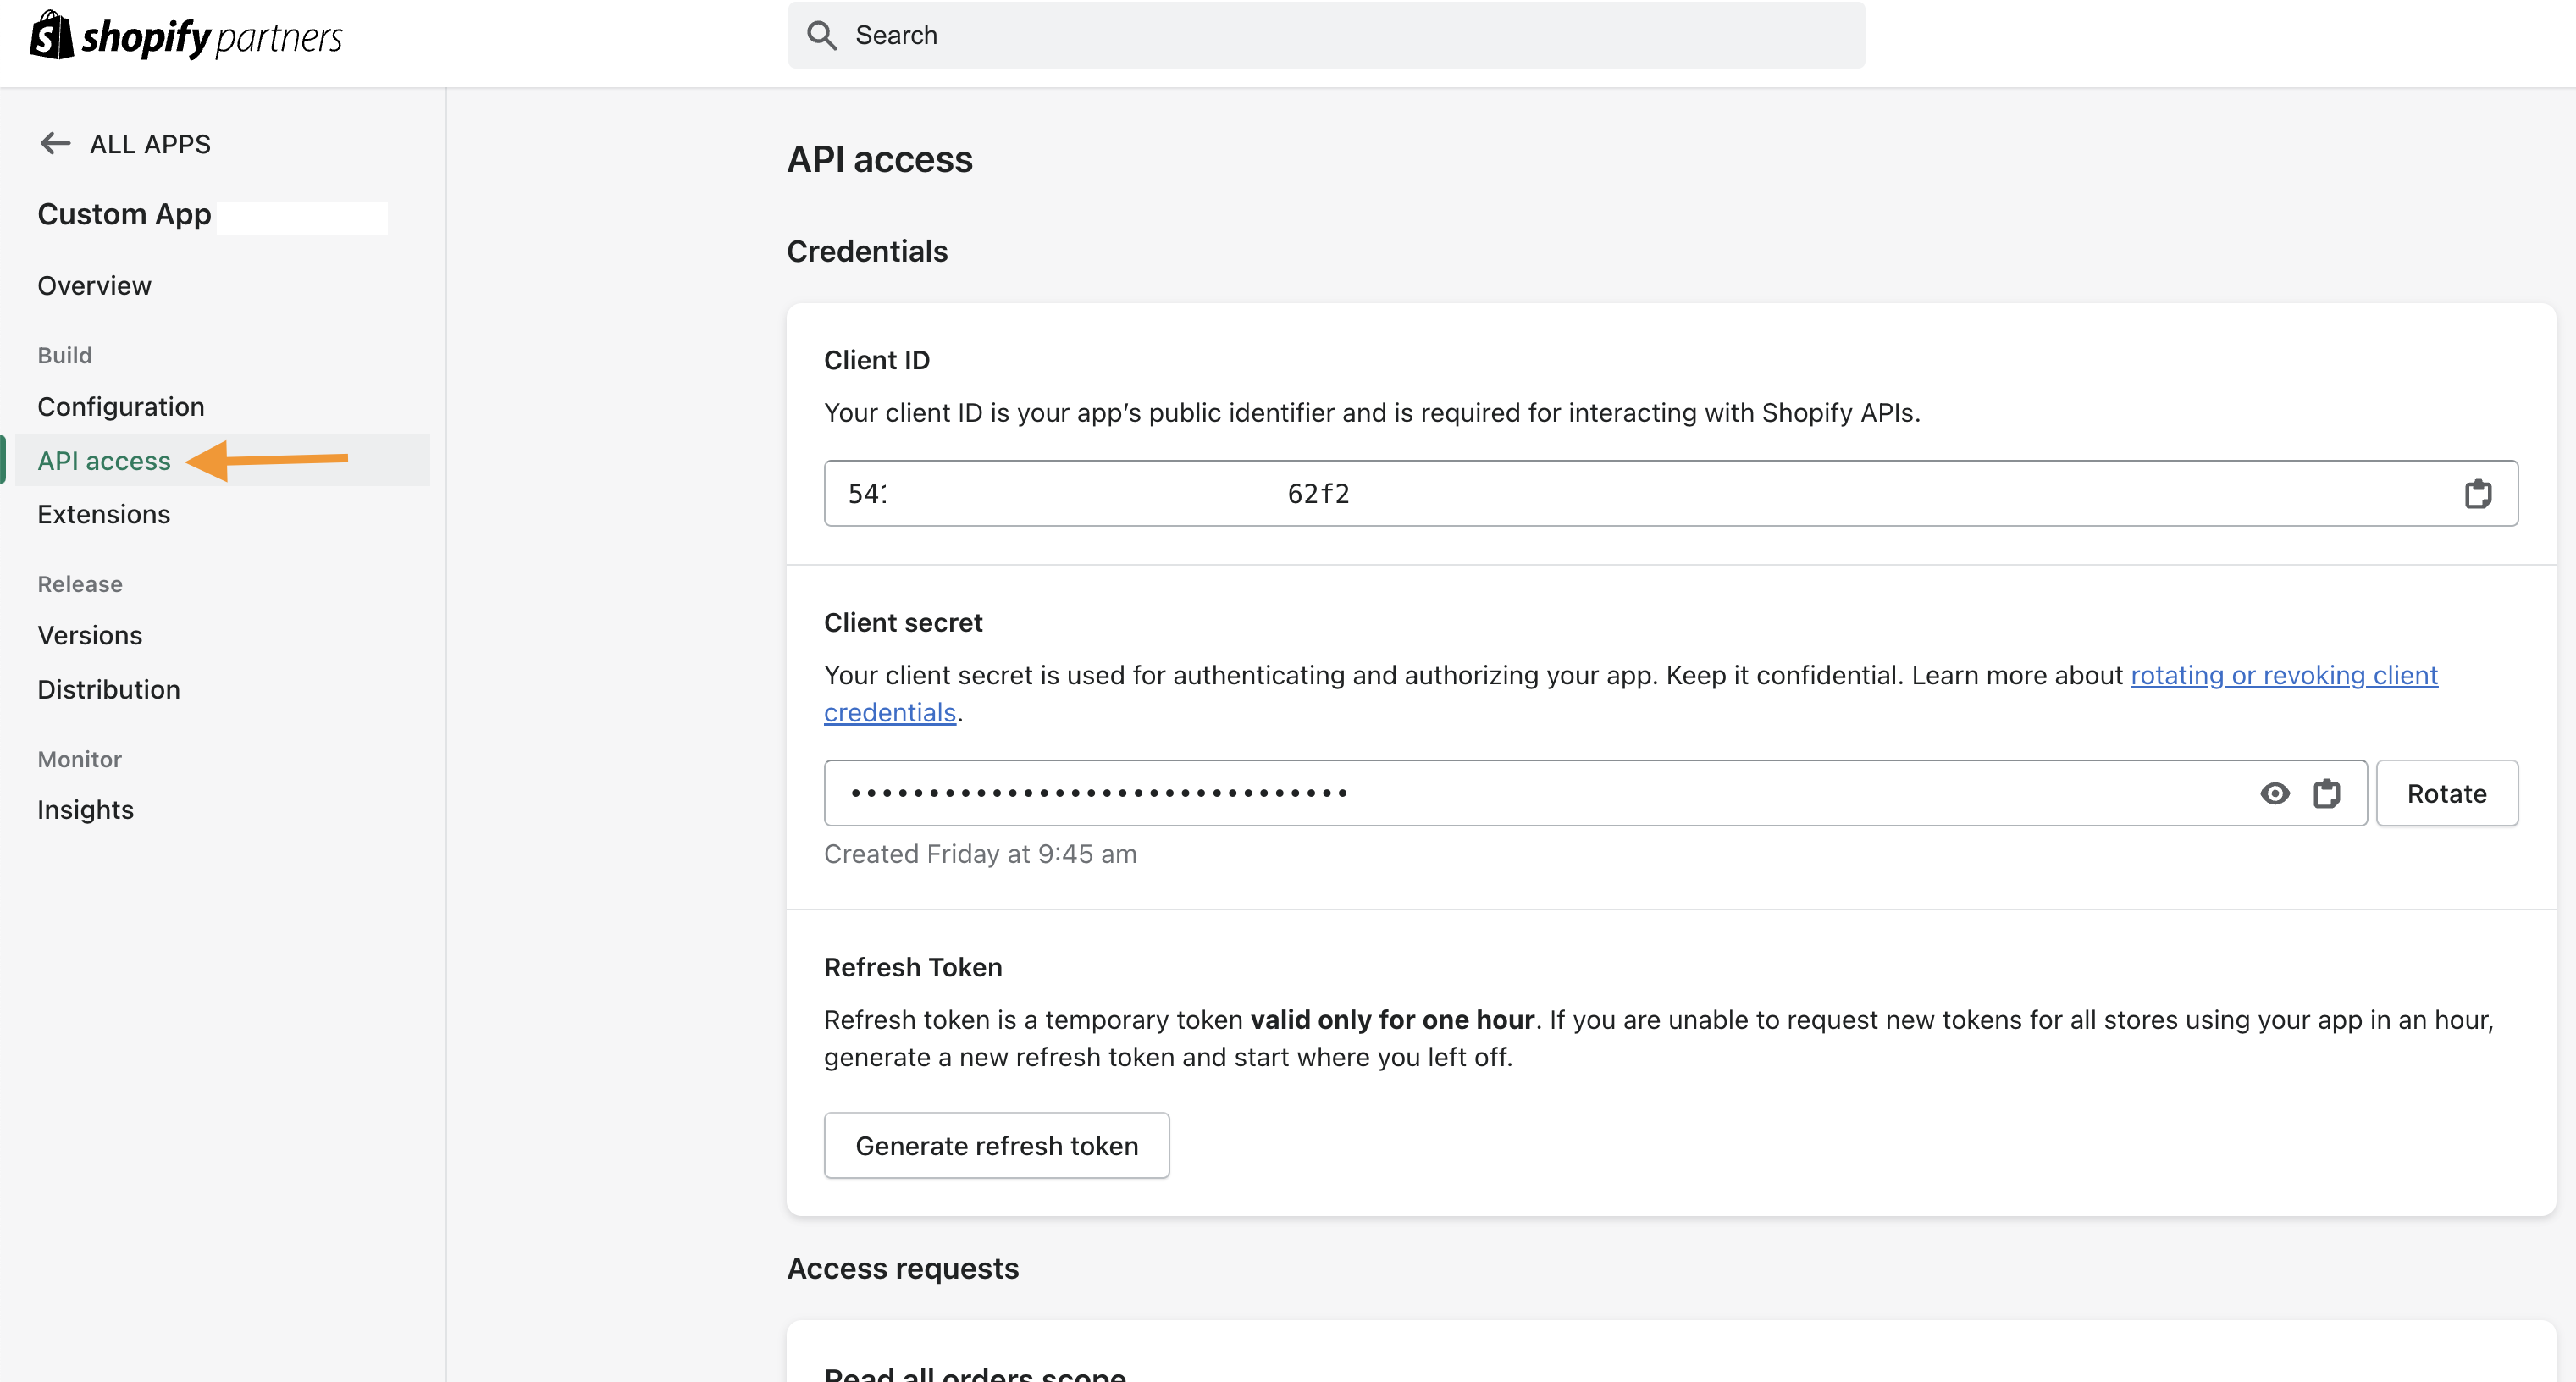
-
Now you will go to your Vrio instance and navigate to
https://{vrio_instance_url}/shopify_shop. Here is where you will add the new shop. -
Click Add Shopify Shop in the top right.

-
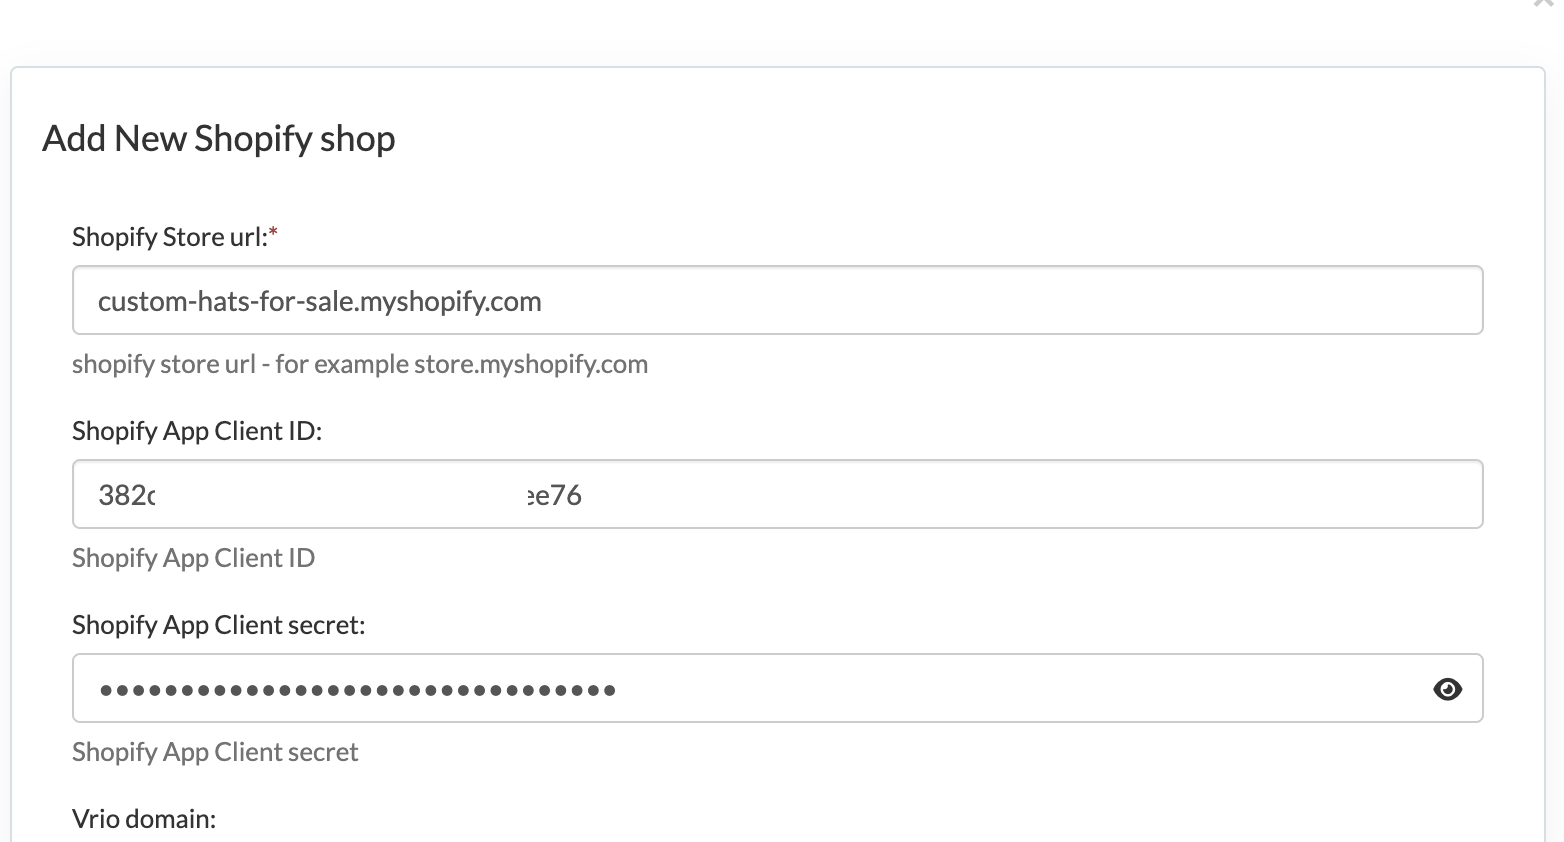
Then on the popup, you will need to enter the following information
-
Shopify Store URL enter the store URL.. example : custom-hats-for-sale.myshopify.com
-
Shopify App Client ID enter the Client ID from step 10
-
Shopify App Client secret enter the Client Secret from step 10
-
Click Submit.
-
-
In the Shopify app click on Distribution. Click the Copy button and paste the URL into a browser. Follow the steps to install the app.
-
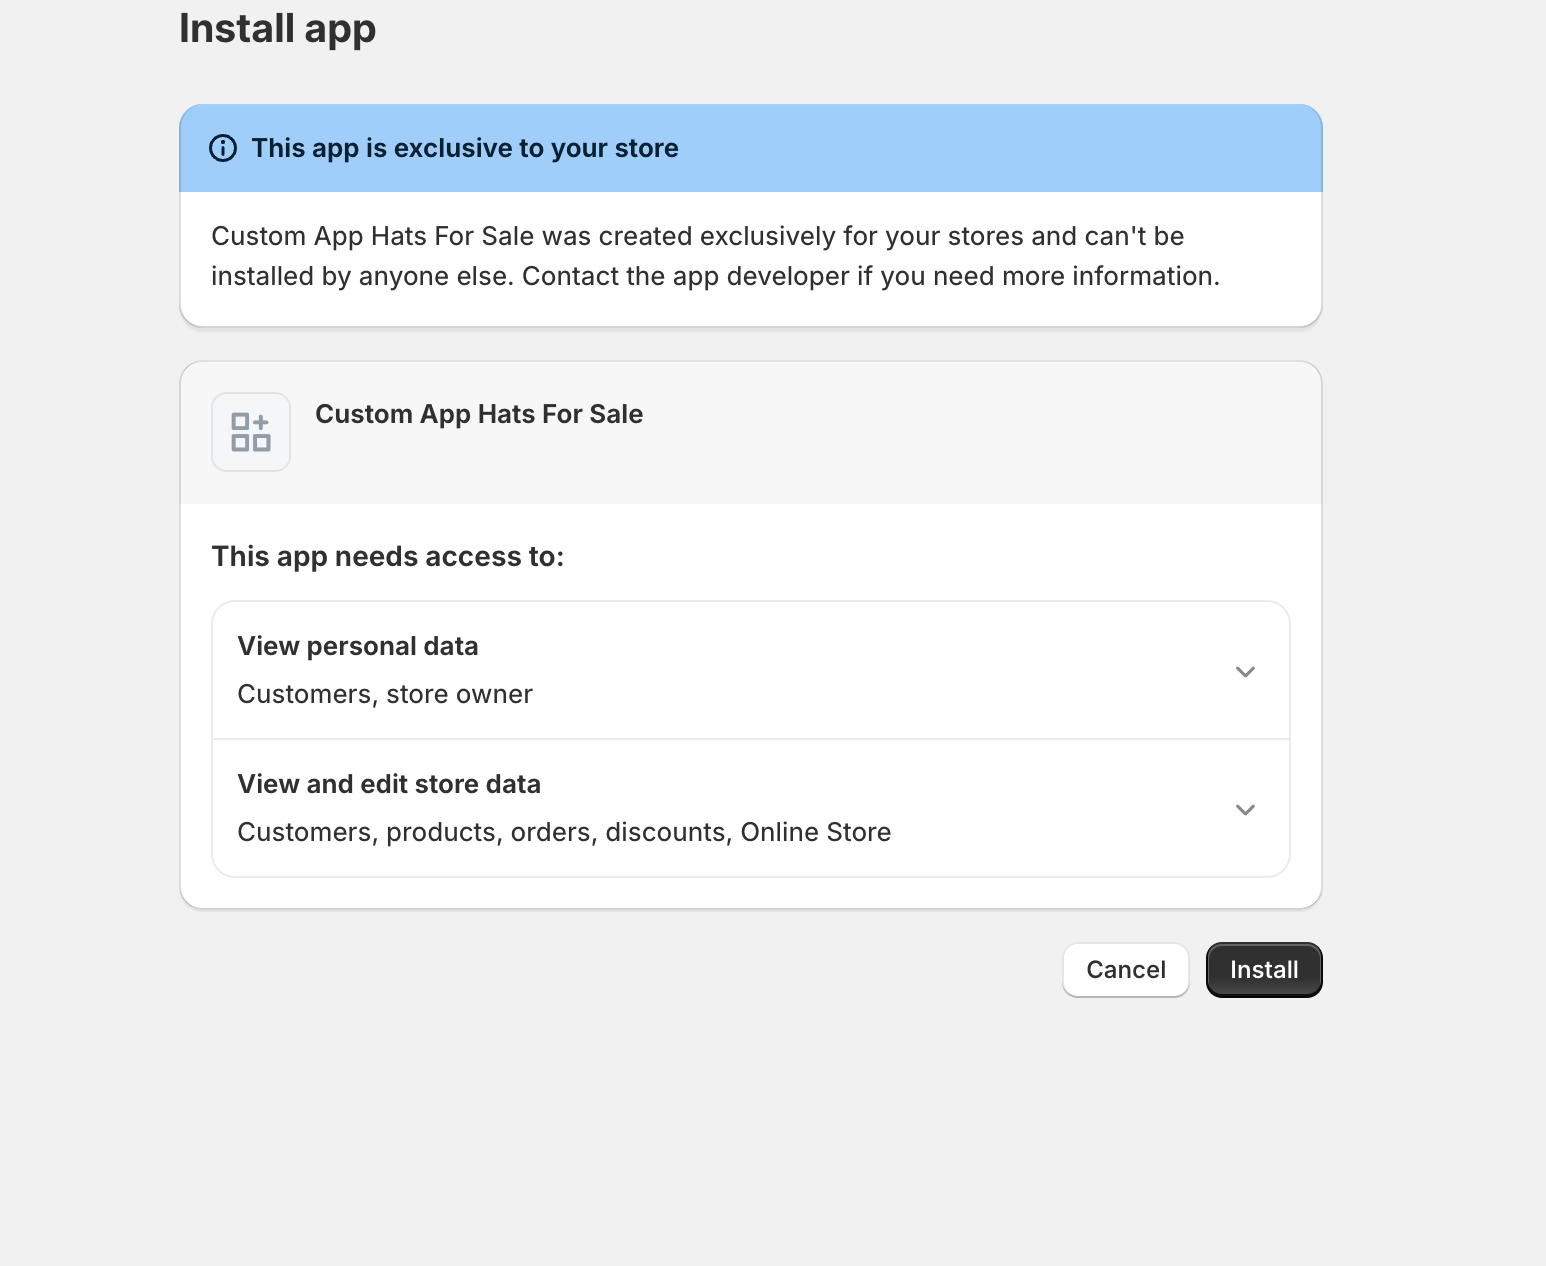
It may ask you to choose the store to add the app to, then it will redirect you to the store and from there click Install App.
-
Once this is complete. Leave this page open and go back to your Vrio instance.
-
-
Link your Vrio Billing Connection to your Shopify Store. There are two options here:
- Single Shopify Store:
- Navigate to Connections within Vrio (settings-> View All connections)
- Select the Vrio Billing Connection and under Default Linked Connection, choose your Shopify connection
- Multiple Shopify Stores and you do not want to link the customers together?
- Add a new Vrio Billing Connection for the Shopify App
- This step is needed if you have multiple shopify stores in your Vrio instance and do not want purchases from multiple stores to link to the same customer if the customer places an order with the same email across multiple stores.
- In this instance I will create a new Vrio connection and call it Custom Hats Vrio Connection. Then you will choose the Shopify connection that was created after the app install. In this case it was custom-hats-for-sale. Then check the Push to Origin Store and hit submit.
- If you do not meet the above criteria, skip this step and just
- Add a new Vrio Billing Connection for the Shopify App
- Single Shopify Store:
-
Navigate back to the app page from step 14 and refresh the page. Now you will see options for the app. Check on the Use Hosted Checkout and the app will start to take over the checkout. Select other options if needed, learn more here.
Shopify to Fulfill ShipmentsIf you are using Shopify to fulfill shipments, check the Use Shopify as fulfillment connection in order to collect the tracking numbers.
- Lastly, you will need to configure your campaign associated with the new Shopify store, including your merchants/payment router, shipping, etc. Follow the checklist here.
Key Components to verify
- Within Vrio: Shopify Store is linked to your Vrio Billing Connection
- Within Vrio: Default Campaign for Shopify store is created and linked to the Shopify Connection
- Within Shopify: Use Hosted Checkout is checked within the Custom App
Shopify Custom App
Once the Vrio Custom App has been installed to your store, you can go adjust the necessary settings within Shopify.
Under Apps, you will see the Custom App installed.
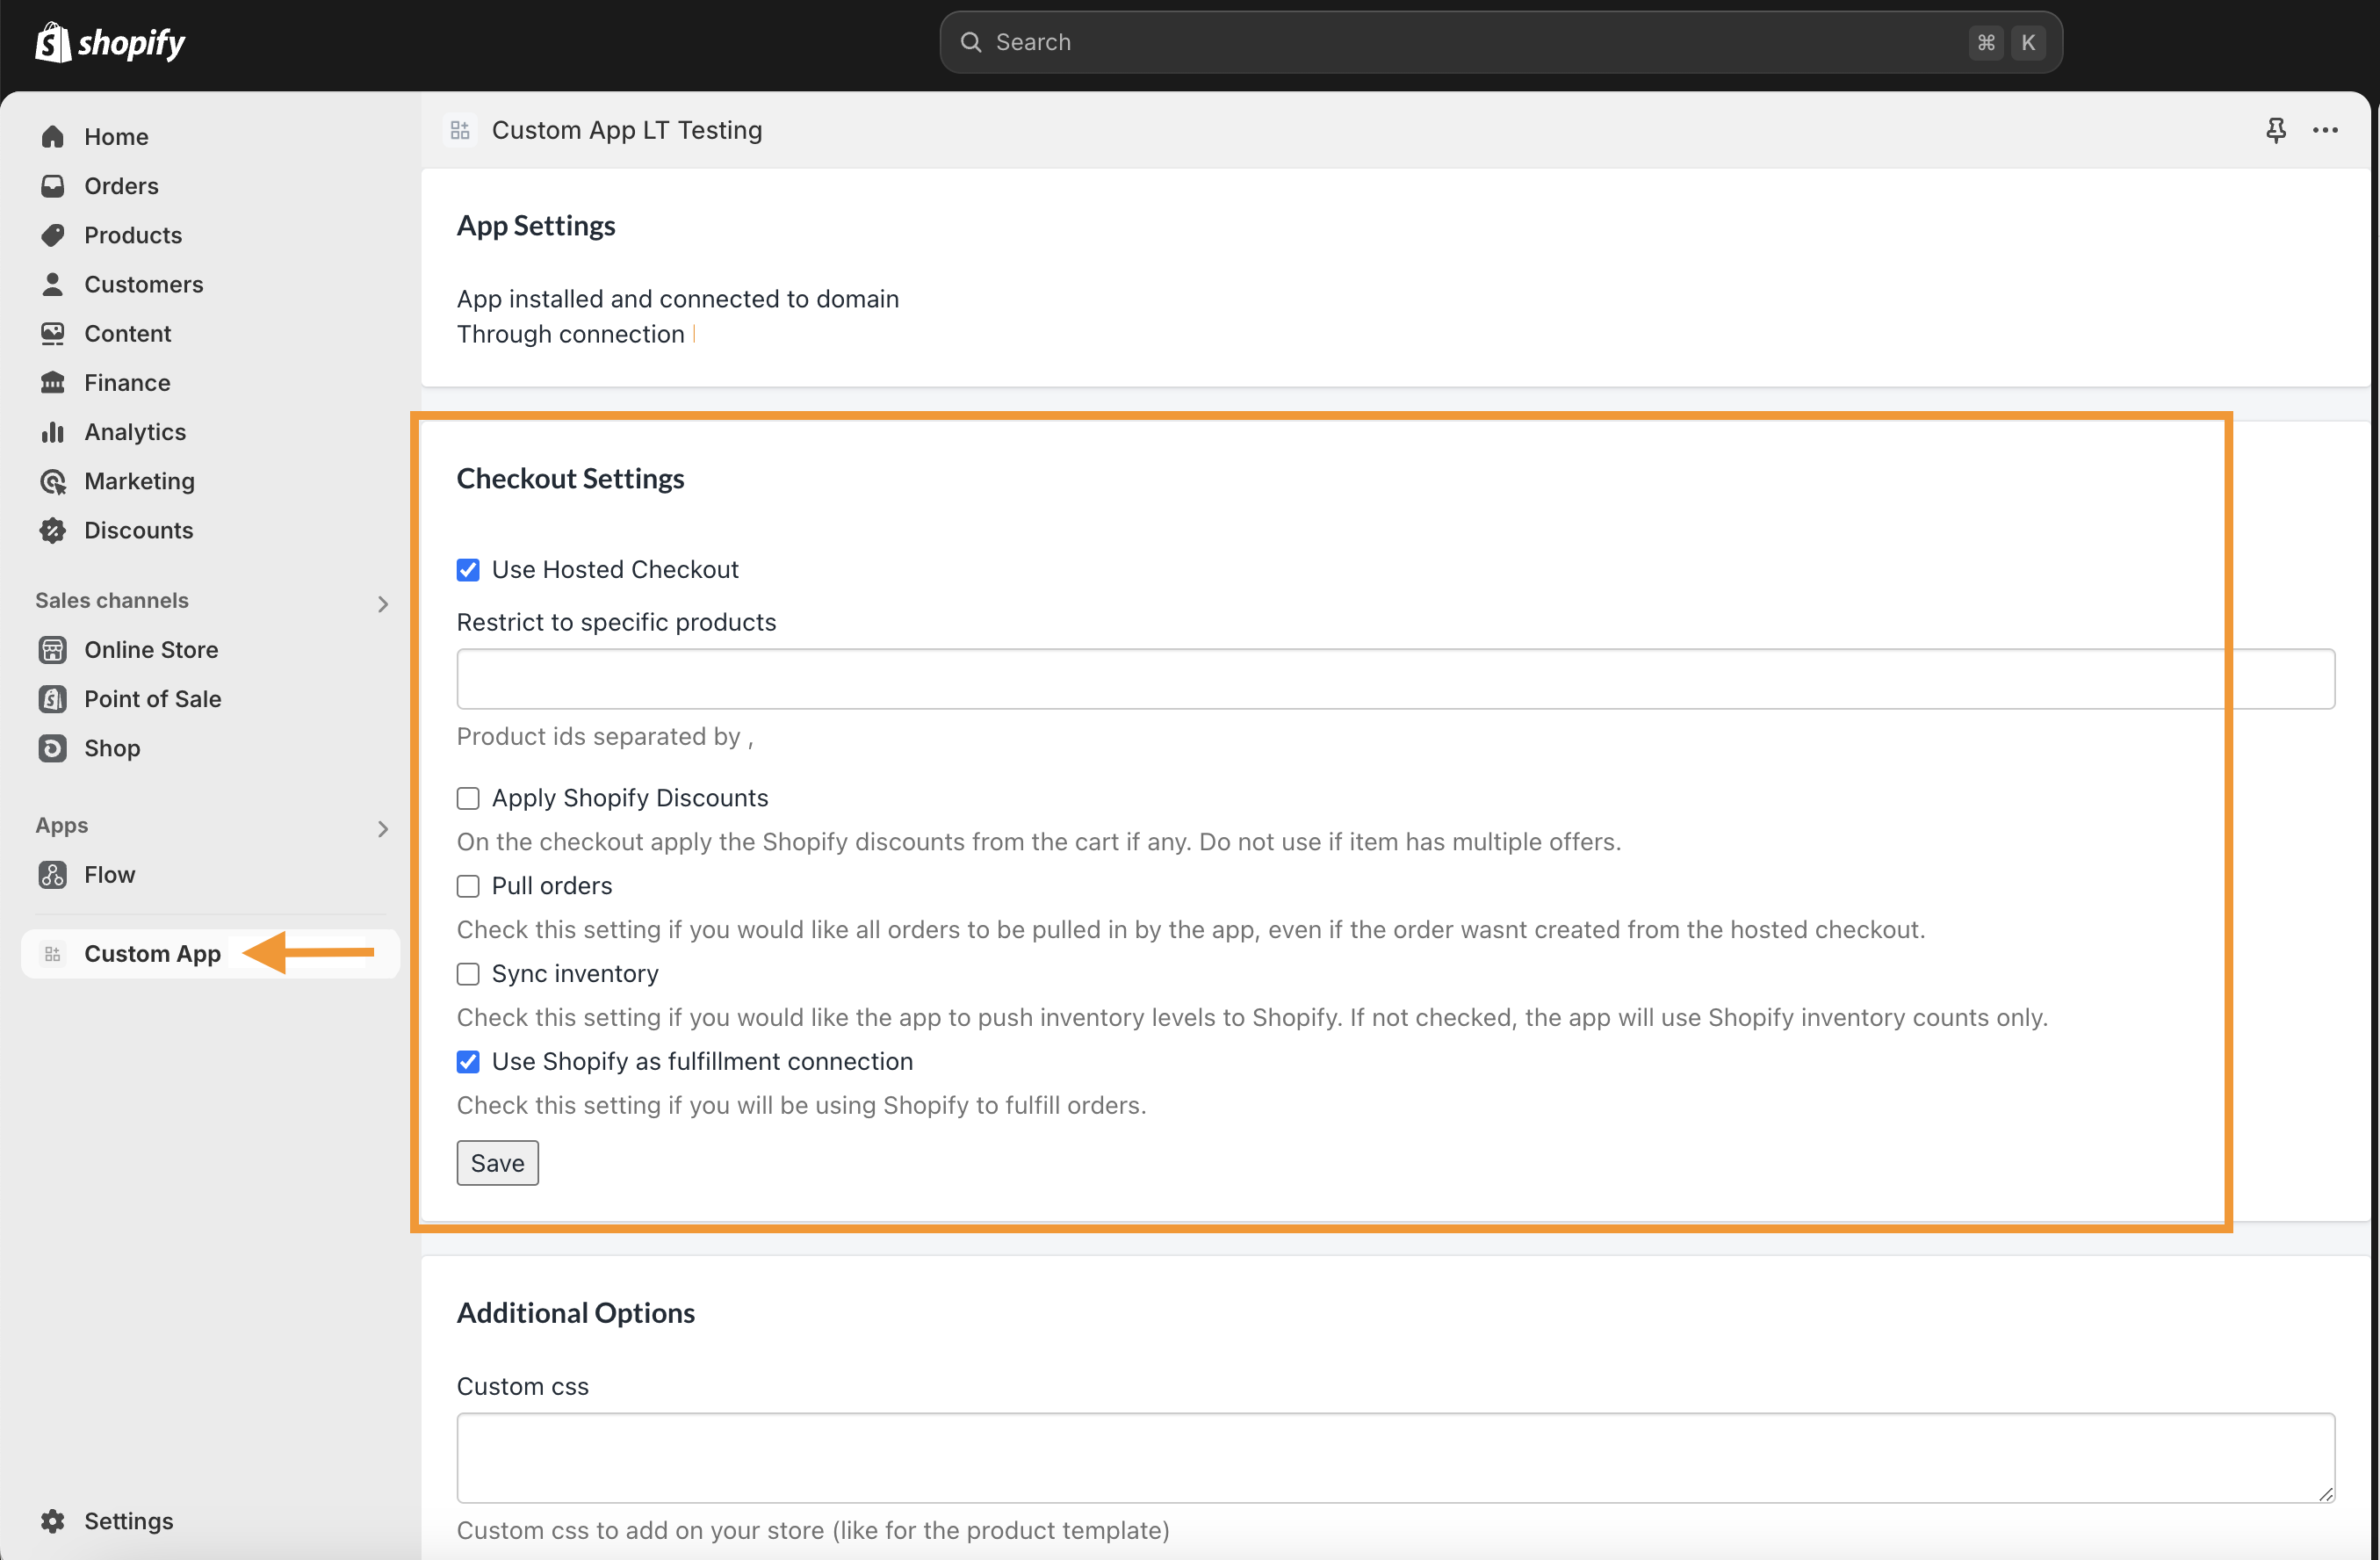
The settings within the Custom App are defined as below:
Checkout Settings | Description |
|---|---|
Use Hosted Checkout | When Checked, the Vrio Checkout will take over. Learn more about the Checkout here. |
Restrict to specific products | Typically for testing purposes. If products are listed, the Vrio Checkout will only take over for those specific products. The native Shopify checkout will be used for all others. |
Apply Shopify Discounts | When Checked, if your Shopify Cart has the option to input a discount, that will be used in the Vrio Checkout. When unchecked, the discount will not carry through. NOTE: |
Pull in all orders not created by app | When Checked, Vrio will pull orders created in Shopify outside of the Vrio Custom App. When unchecked, only orders that are created by the Vrio Custom App will be in Vrio. |
Sync Inventory | When Checked, Vrio inventory will push to Shopify. When unchecked, Shopify will manage inventory. |
User Shopify as Fulfillment Connection | When Checked, Vrio will not manage shipments. Shipments will be shipped and managed from Shopify. In the instance of a subscription, Vrio will submit the new order to Shopify and Shopify will fulfill that order. When unchecked, Vrio will manage all shipments. A fulfillment provider will be connected in Vrio and associated with the Items. |
Vrio Configuration
Once the Vrio Campaign has been created, you will need to go in and configure the campaign based on your preferred settings.
Utilizing the Vrio Setup Checklist is the best way to review all the options at your disposal.
Customizing the Vrio Checkout
-
Navigate to your Campaign that is linked to the Shopify Store
-
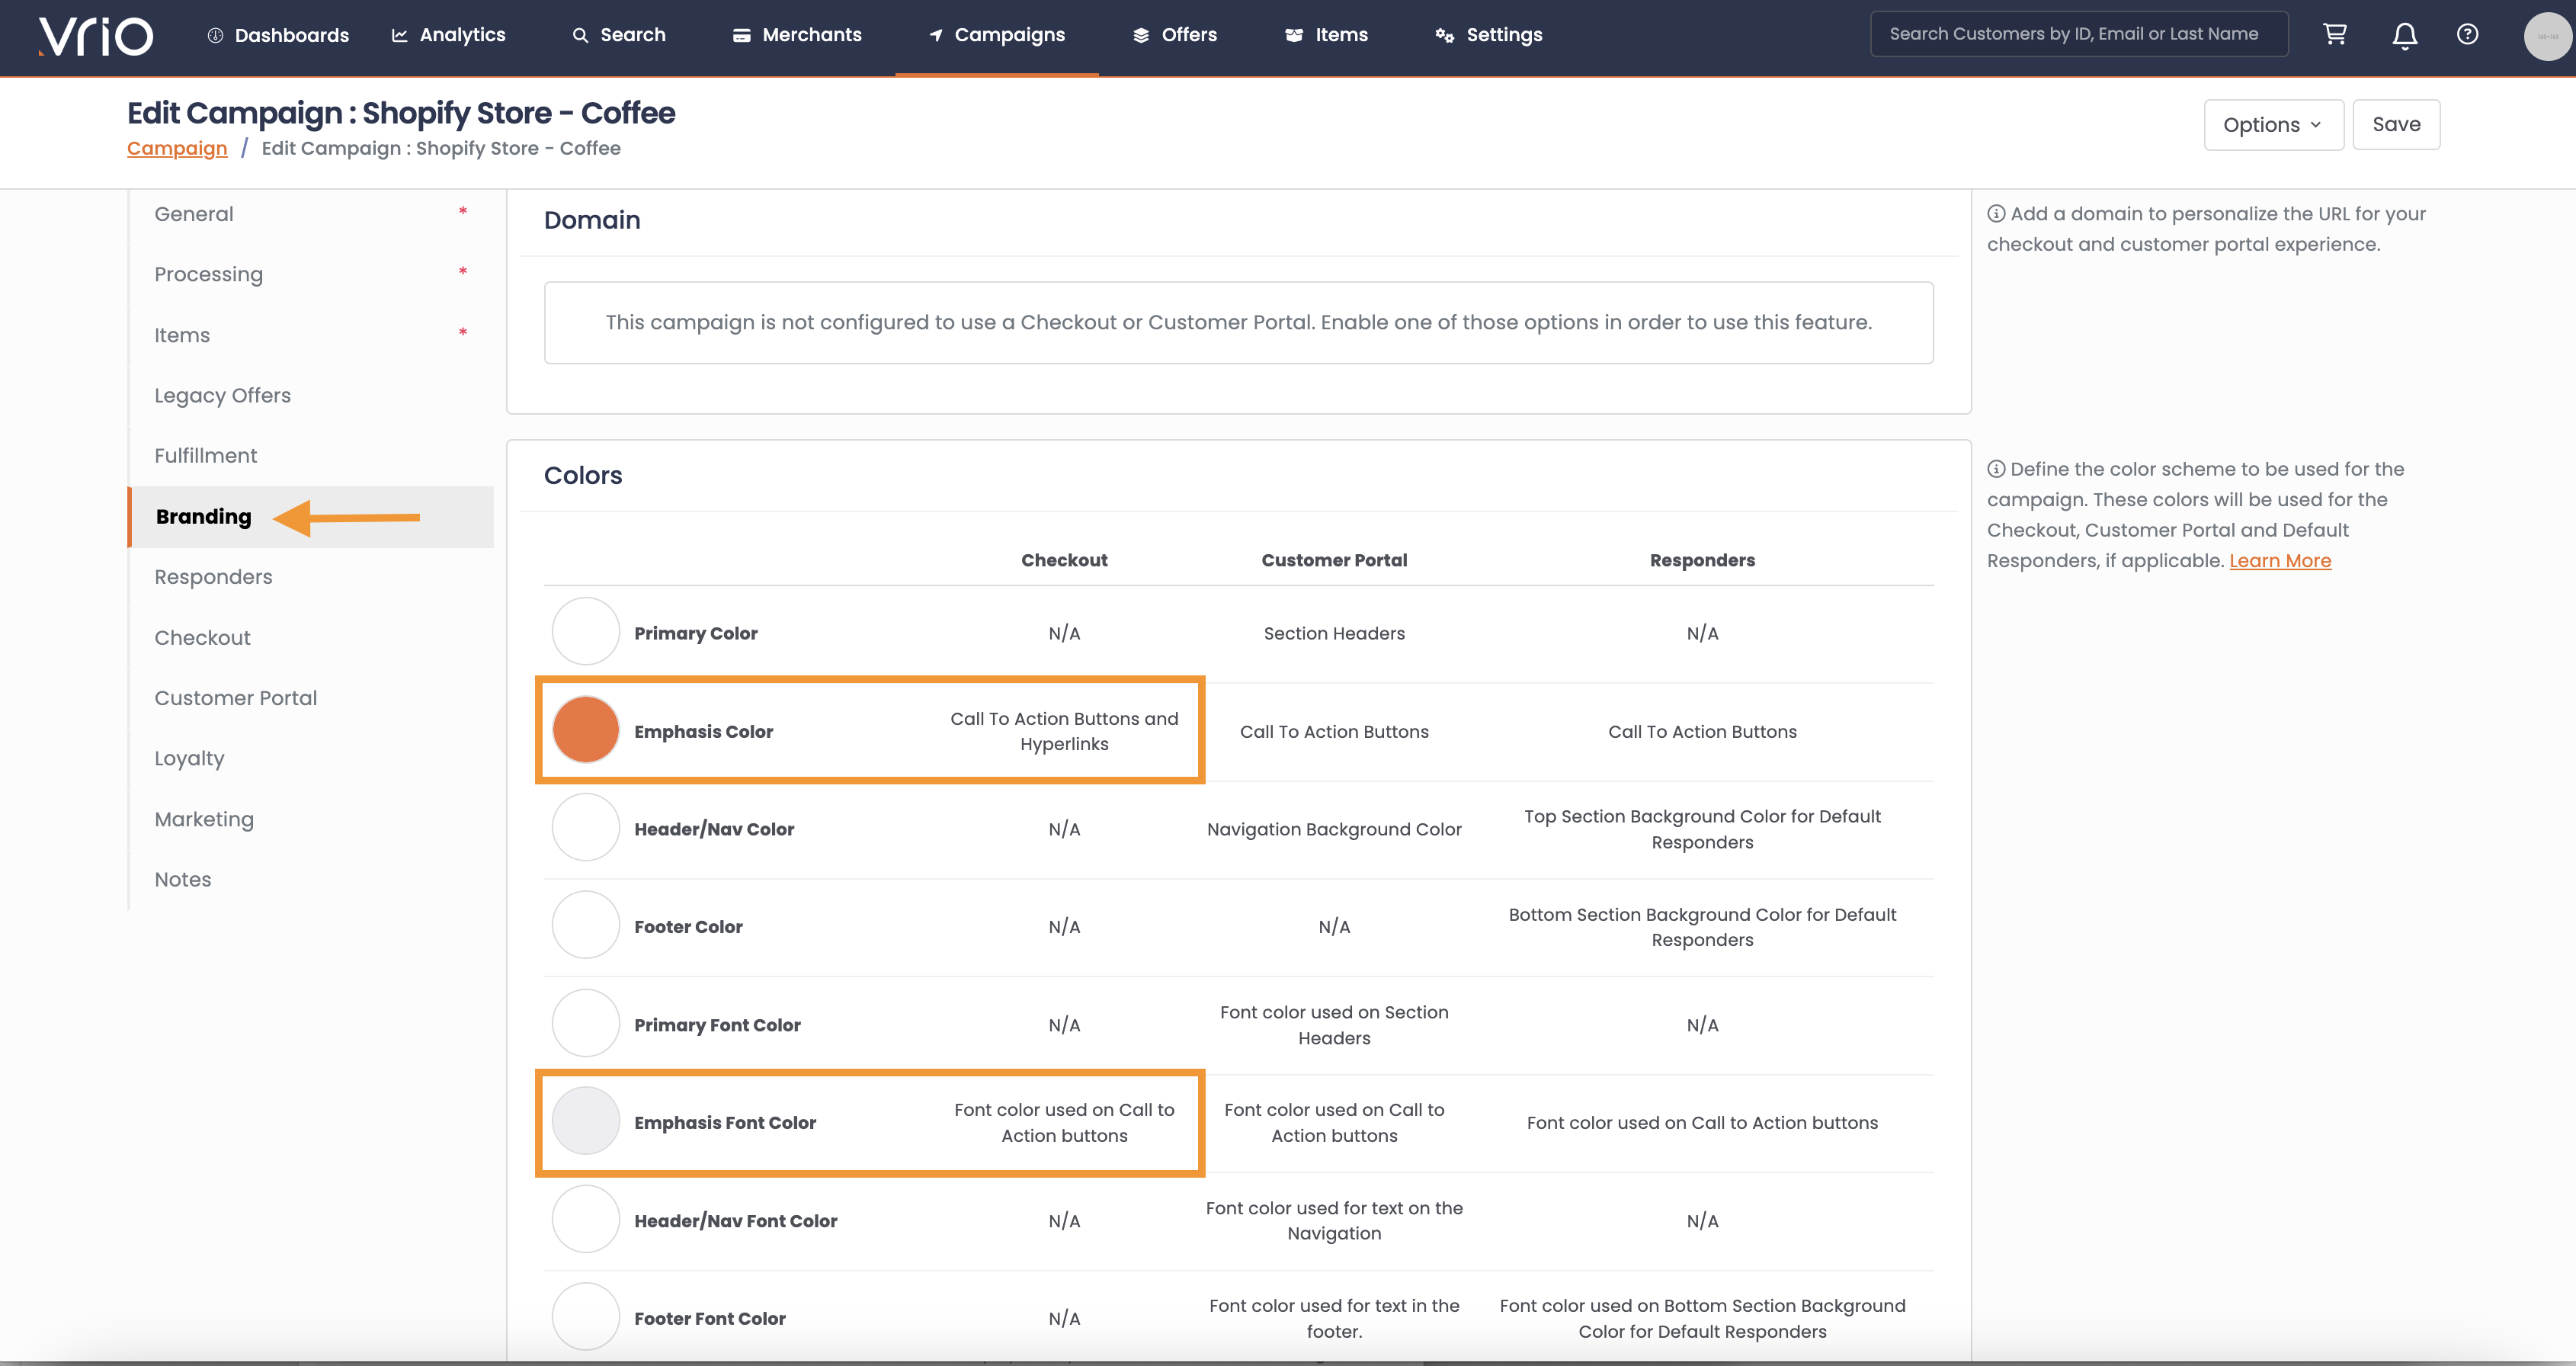
Branding
-
On the Branding Tab, select the Colors, Fonts and Images to be used on the checkout
-
-
Next, navigate to the Checkout tab within the campaign. Here you will be able to add certain customization elements to the Vrio provided checkout
-
Input Field
Desciption
GENERAL SETTINGS
Company Name
This will be shown as the copyright holder in the footer of the application.
If left blank, there will be no copyright section on the checkout
Page Title
The title shows on the window tab of the checkout.
If left blank, it will display "Secure Checkout"
Checkout Confirmation Location
Select a destination to send the user after a completed order. Leave empty to use the standard Vrio thank you page. Merge Tags available for URL: {order_id}, {cart_token}
Checkout Type
3 different template options:
- *One Page:** All customer data collection is on a single page
- *Two Page:** 1st page: Customer email, phone and Shipping address is on the first page, then on the 2nd page they will choose Shipping Method (if applicable), submit the payment information, add a different billing address (if applicable) and display any Terms and Conditions
- *Three Page: 1st page: Customer email, phone and Shipping address is on the first page, then on the2nd pagethey will choose Shipping Method (if applicable),3rd page:** submit the payment information, add a different billing address (if applicable) and display any Terms and Conditions
Google Tag Manager
Add your Google Tag Manager container ID to associate with this checkout.
OTHER CONFIGURATION
Phone Required
When Checked, phone number input will be required to checkout
If left unchecked, phone number will be optional
TERMS
Required Terms
If applicable, terms that will display that will be required to
Auto Check Required Terms
When checked, the Required Terms will be already checked during the checkout.
When left unchecked, the customer will have to check the box for the required terms to complete checkout.
Require Terms Checkbox for
This allows you to set which Offers require the Terms to be checked. This can be none, all, recurring offers only or you can select specific offers.
This is what will determine when the terms will display and be required for checkout.
Non-Required Terms
If applicable, terms that will display, but not be a requirement to complete checkout
Opt In Text
This will display under the customer email input section, allowing them to opt in / out of marketing (as an example)
Terms URL
URL to redirect to for the Terms and Conditions. This will display at the footer of the checkout
Privacy URL
URL to redirect to for the privacy details. This will display at the footer of the checkout
Contact URL
URL to redirect to for the contact details. This will display at the footer of the checkout